Kamis, 29 Januari 2009

Stopper Knot

The stopper knot is very handy in several situations. For instance you could tie one in the end of the rope it stop it unexpectedly passing through the belay/abseil device. Use it to backup your figure eight follow through tie in knot. Two stopper knots are used to make the double fishermans for joining two ropes.

To tie a stopper knot in the end of the rope, follow these steps.
Step 1Step 2
Step 1: Form a loop. Step 2: Form a second loop behind the first one, as shown.
Step 3
Step 3: Pass the end back through both loops.
Step 4: Stopper Knot

Step 4: Pull tight.

Read more »

Garda Hitch ("Alpine Clutch")

Also known as the "Alpine Clutch", this knot locks the rope so it can only move in one direction. It can be used, for example, (in combination with other knots), to ascend the rope or as part of a pulley system for hauling loads. If done correctly it works well, however, I'm not a big fan of this knot and have never used it in a real life situation. If the knot really locks up you might need to prise it free with a nut tool. Also when experimenting with it, I've had one carabiner unclip itself. Note, oval carabiners are recommend, not those shown in the pictures below. I suggest you backup whatever you're doing with it. Judge for yourself if it is a valid option for your application. Follow these steps to tie the Garda Hitch:

Step 1 (Click To Enlarge)Step 2 (Click To Enlarge)Step 3 (Click To Enlarge)
Step 4 (Click To Enlarge)Step 5 (Click To Enlarge)
Step 1: Clip two carabiners, gates reversed, but spines aligned as pictured. Note it is recommend that you use oval carabiners rather than those pictured. Steps 2 & 3: Clip the rope through both carabiners from left to right, and form a loop with the right side tail. Step 4: Clip the loop through the left hand carabiner as pictured. Step 5: Pull tight and apply load. The knot is supposed to slip down the carabiner's spines a little. I suggest having some for of backup rather than relying totally on this knot.


Read more »

Jumat, 23 Januari 2009

Mariner's Knot

This knot has the advantage of being releasable underload. Something that can come in handy for rescue work, among other things. The knot looks scary, but is safe provided you clip both protruding tails. The knot will slip a bit when weighted. Ideally the knot should not be used unweighted. Follow these steps to tie a Mariner's knot:

Step 1 (Click To Enlarge)Step 2 (Click To Enlarge)Step 3 (Click To Enlarge)
Step 1: Wrap a loop of accessory cord (or webbing), around an anchored carabiner. Step 2: Wrap the appropriate end of the cord around the other end four or so times, forming the knot as pictured. On the last wrap feed the cord through the remaining loop, leaving it protruding somewhat. Clip a quickdraw (or similar), from the protruding tail to your anchor - this is your backup in case the knot slips too much and fails. Then clip your load to the other end.


Read more »

Slip Knot

The slip knot is handy because, as it's name suggests, you can slide it up to adjust the size of the loop. You might use it to sling a horn ("chicken head") of rock for example. Follow these steps to tie a slip knot using a sling:

Step 1 (Click To Enlarge)Step 2 (Click To Enlarge)Step 3 (Click To Enlarge)
Step 1: Form a loop in the sling. Step 2: Feed a second loop through the first. Step 3: Work the knot tight and upwards as required until its snug against the thing you are tying off.


Read more »

Munter Hitch

This knot is useful for both abseiling and belaying. It's advisable to use a pear-shaped locking carabiner, and try to avoid cross-loading it. The knot will "flip" as opposite strands of the rope are pulled, this is normal. To lock the knot, apply the braking hand by moving the slack line parrel with the loaded line. See pictures below:

(Click To Enlarge)(Click To Enlarge)(Click To Enlarge)
Figure A: Here you're feeding out slack when belaying, or you're abseiling down. Figure B: To lock the Munter Hitch draw your brake hand up parallel with the load line. Figure C: The knot will correctly "flip" into this position as you take in slack when belaying.


Read more »

Clove Hitch

This knot is useful in belay set ups among other things, because it's fairly easy to adjust, unlike, for example a figure eight. With a bit of practise it can be tied one handed. Follow these steps:

Step 1 (Click To Enlarge)Step 2 (Click To Enlarge)Step 3 (Click To Enlarge)
Step 4 (Click To Enlarge)Step 5 (Click To Enlarge)
Step 1: Form a loop in the rope. Step 2: Form a second loop in the opposite direction to the first. Click the image above for a closer look. Some people do this by crossing their hands over (like an X), grabbing the rope in each hand and then drawing two loops whilst uncrossing hands again. Step 3: Place the second loop over the first. Step 4: Clip a carabiner through the loops. Step 5: Pull tight.

sumber : http://www.chockstone.org/TechTips/CloveHitch.htm
Read more »

Friction Knots

The Prusik Knot
The good old prusik knot is very, very useful. All you need is a loop of cord which you can make using 6 or 7mm accessory cord and a double fisherman's knot. With one or two prusiks you can ascend a rope, or rig a z-pulley to haul up an injured climber, or backup an abseil. Suffice it to say it's worth learning this gem of a knot. There are numerous variations on the prusik such as the "autoblock", but follow these steps to tie the standard prusik knot:
Step 1 (Click To Enlarge)Step 2 (Click To Enlarge)Step 3 (Click To Enlarge)
Step 4 (Click To Enlarge)Step 5 (Click To Enlarge)Step 6 (Click To Enlarge)
As you can see you simply wrap the loop of cord around the rope going through the inside of each previous wrap. The more wraps the "grippier" the knot. Three wraps is generally enough. Step 6: Pull the knot tight, neaten up the wraps and use the tail loop to clip into. Leaving the knot a little loose it can be slid up and down the rope. Weight the knot and it will grab the rope and lock off. Note: this form of prusik knot can sometimes be difficult to loosen once it has been tightened by the weight of a climber.


The "Klemheist" and "AutoBlock" Knot
The difference with the Klemheist (also called "Machard", or "French Prusik") compared to the normal Prusik is that it can be moved once weighted and will work with webbing as well as cord. This can be very handy in certain situations. Follow these steps to tie a Klemheist:
Step 1 (Click To Enlarge)Klemheist (Click To Enlarge)
Step 1: Simply wrap a loop of cord around the rope several times. Step 2: Feed the bottom tail through the top tail and clip bottom tail with your load.

The "Autoblock" is essentially the same knot as the Klemheist, except that in the last step you simply clip both tails together with a carabiner, rather than feeding one through the other.


The Bachman Knot
This knot makes use of a carabiner as a handle to ease shifting the knot up and down the rope. Note if you pull down on the carabiner, it will unlock the knot, moving it downwards. Likewise yank the carabiner upwards to shift it in that direction. This knot is not so good on icy ropes. Follow these steps to tie a Bachman knot:

Step 1 (Click To Enlarge)
Step 2 (Click To Enlarge)Bachman (Click To Enlarge)
Steps 1 & 2: Clip your loop of cord through a carabiner and begin wrapping the cord around the rope, feeding it through the carabiner with each pass. Keep the wraps nice and snug. Step 3: Allow the tail of the cord to hang down (as pictured), and clip your load to this protruding tail. Do not clip your load to the carabiner functioning as the "handle".


One Method Of Racking Your Accessory Cord
Here's one way to rack your prusik cords so that they have a small profile on your harness gear loops. Simply twist the cord about it self. Follow theses steps:
Step 1 (Click To Enlarge)Step 2 (Click To Enlarge)Step 3 (Click To Enlarge)
When you need to deploy the cord, a quick shake will work out the kinks.

Read more »

Double Bowline Knot

This knot is sometimes used as a "tie-in", to attach the rope to the climber's harness, instead of the standard figure eight follow through. It has the advantage over the figure eight of being easier to untie after the knot has been weighted. However, it has several disadvantages, such as being less simple to visually inspect, and prone to slippage, requiring the addition of a stopper knot to be really secure. It's also considered weaker than the figure eight. Follow these steps to tie a double bowline:

Step 1 (Click To Enlarge)Step 2 (Click To Enlarge)Step 3 (Click To Enlarge)
Step 4 (Click To Enlarge)Step 5 (Click To Enlarge)
Step 1: Form two loops and thread the tie in point (harness, whatever). Steps 2 & 3: Weave the rope back through the loops, around the main line, then down through the loops again. Step 4: Wrap the tail as pictured. Step 5: Finish with a stopper knot to ensure there is no slippage.

sumber : http://www.chockstone.org/TechTips/Bowline.htm

Read more »

Rabu, 21 Januari 2009

Isi Ulang Baterai Bisa dengan Air Kencing?


Baterai ramah lingkungan yang satu ini benar-benar unik. Betapa tidak? Baterai yang dinamakan NoPoPo tersebut bisa diisi ulang dengan memanfaatkan beragam cairan, termasuk air kencing.


Dikutip Tech Digest, baterai ini dibuat perusahaan bernama Aqua Power System yang berbasis di Jepang. NoPoPo sempat dipamerkan di perhelatan CES (Consumer Electronic Show) 2009 yang belum lama berakhir.

Selain dengan air kencing, isi ulang NoPoPo juga bisa memanfaatkan air bir, jus apel, dan minuman cola. Caranya cukup dengan memasukkan cairan pada penampung kecil yang ditautkan di baterai.

Dilansir PcMag, cairan tersebut dipakai untuk membangkitkan reaksi antara magnesium dan alumunium di baterai. Daya yang ada memang tidak sekuat baterai AA pada umumnya, hanya cukup mendayai perangkat seperti jam mungil.

Baterai NoPoPo ini sudah tersedia di negara Jepang. Adapun banderol harganya sekitar US$ 15 per unit
Read more »

Sabtu, 10 Januari 2009

VAIO P Series Lifestyle PC


Asli keren banget nih laptop. Kata-kata ini yang aku ungkapkan setelah melihat laptop yang dikabarkan akan direalese pada pertengahan februari 2009 nanti.Bosan dengan bentuk lama, Sony Vaio kini mencoba untuk meluncurkan laptop yang berbentuk persegi panjang. Dijamin anda akan terkagum-kagum dibuatnya.


Bagaimana ga kagum?laptop yang sekilas memiliki ukuran sebesar amplop ini dibekali dengan layar 8 inch dan memiliki teknologi Xbrite Eco LCD. dan layar menghasilkan resolusi 1600x768

Sama seperti netbook lain pada umumnya, Vaio seri P juga ditunjang oleh prosesor Intel Atom. Namun, berat dari produk ini masih jauh lebih ringan, yakni cuma 618 gram sehingga diklaim sebagai netbook teringan di dunia.

Tak hanya memori 2 GB, wi-fi dan bluetooth, teknologi GPS yang terinstal dengan sejumlah wilayah juga sudah dibenamkan dalam netbook ini.

Menurut Senior Vice President Sony Vaio, Mike Abary, netbook ini ditujukan untuk memberikan hiburan dan penggunaan komputasi dalam genggaman. "Sehingga bisa dimasukan ke dalam saku baju Anda," ujarnya

Netbook ini sendiri menjadi salah satu 'senjata' pemikat Sony di ajang CES 2009 yang digelar di Las Vegas, AS. Menurut rencana, netbok berbanderol US$ 900 ini baru akan tersedia di pasaran Februari nanti dan tersedia dalam pilihan warna merah, hijau gelap, hitam dan putih

  • VAIO® P Series


  • Read more »

    Rabu, 07 Januari 2009

    LCD TV Tertipis di Dunia


    LCD Samsung (Gadgetrepublic)

    Dari waktu ke waktu ukuran LCD (liquid crystal display) TV kian tipis. Raksasa elektronik Korea Selatan, Samsung, memperkenalkan sebuah LCD TV yang diklaim tertipis di dunia. Seberapa tipis?

    Dikutip dari AFP, Rabu (7/1/2009), LCD ini hadir dengan ketebalan hanya 6,5 milimeter (0,26 inchi), lebih tipis dibanding ukuran LCD TV pada umumnya. Bahkan produk ini diklaim lebih tipis daripada mayoritas LCD handset mobile.

    Lebih lanjut diungkapkan, tingkat ketipisan LCD besutan Samsung tersebut 1/7 dari LCD tertipis Samsung yang saat ini ada di pasaran, Bordeaux 850.

    Produk yang mengadopsi sistem LED (light emitting diode) ini akan unjuk gigi dalam ajang Consumer Electronics Show 2009 yang berlangsung di Las Vegas.
    Read more »

    Joining Two Ropes

    This is a touchy subject. Opinions vary among climbers as to the best knot to use when joining two ropes together. The figure eight, overhand, & double fishersman's are just three methods. There's many reasons why you'd want to join two ropes together, but perhaps the most obvious one is to allow for a full rope length retrievable abseil.


    Rethreaded Figure Eight Push For The Summit
    There is more than one way of joining two ropes using a figure eight knot. The method described below is purely the one I prefer. One disadvantage of this method is that it leaves a bulky profile to the knot which could well get stuck when you pull the abseil ropes down. If speed and stuck ropes is a concern, perhaps investigate the double fisherman's method or the overhand knot (see below). The advantage of the figure eight with stopper knots over the double fisherman's is that it's often easier to untie afterwards, plus what I'd call a psychological advantage. Anyway, follow these steps to join two ropes with a figure eight knot:
    Step 1 (Click To Enlarge)Step 2 (Click To Enlarge)
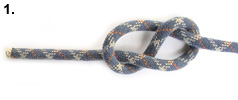
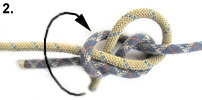
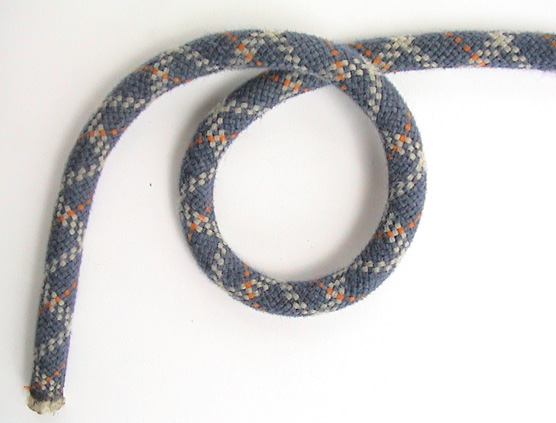
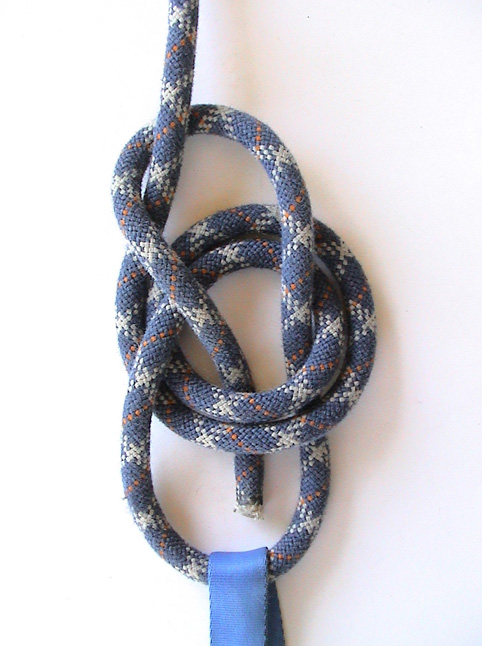
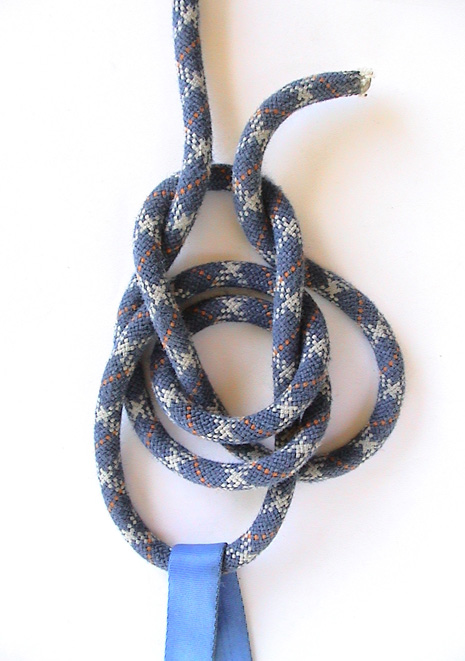
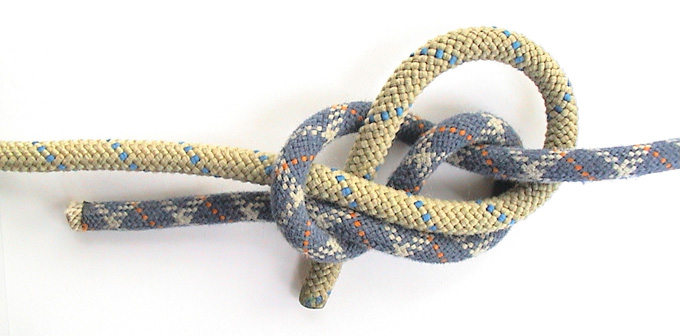
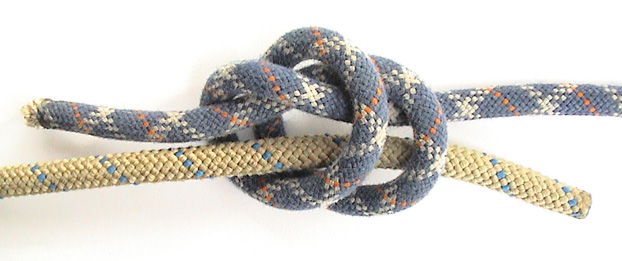
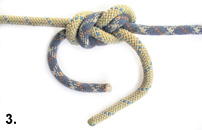
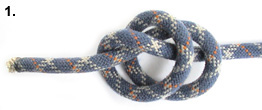
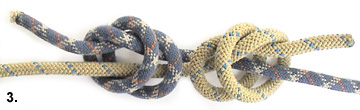
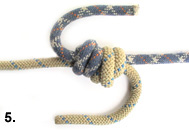
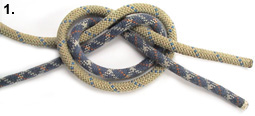
    Step 1: Put a figure eight in the end of one rope. Step 2 & 3: Rethread the eight with the end of the other rope. Leave plenty of tail (probably more than pictured), because the knot will slip a bit as it is tightened.
    Step 3 (Click To Enlarge)Step 4 (Click To Enlarge)
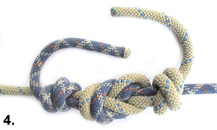
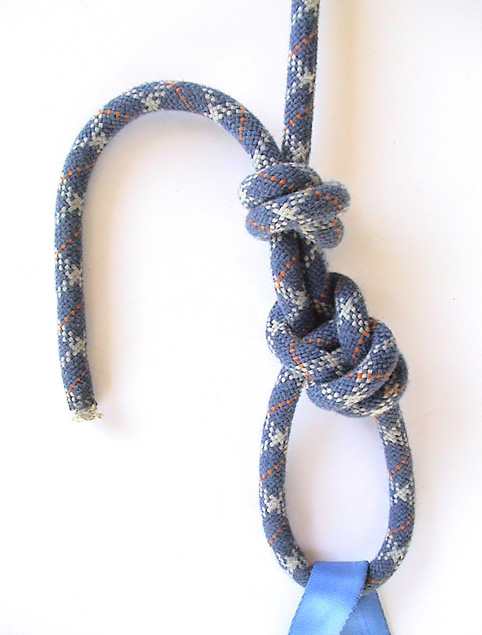
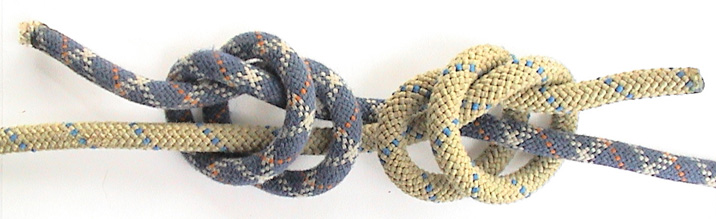
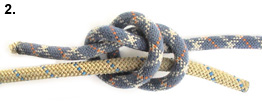
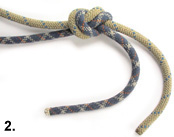
    Step 4: Because I'm paranoid about the figure eight slipping I generally add a stopper knot to each end as well. The figure eight with stopper knots is my preferred method, however as I say, opinions vary.Avoid using the Abormal Figure Eight

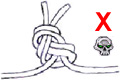
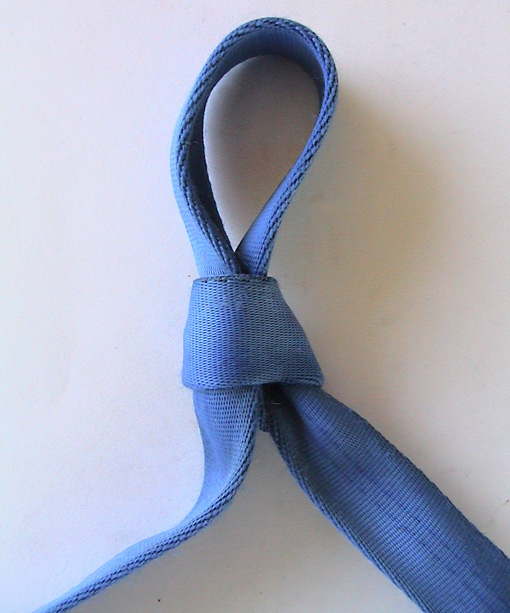
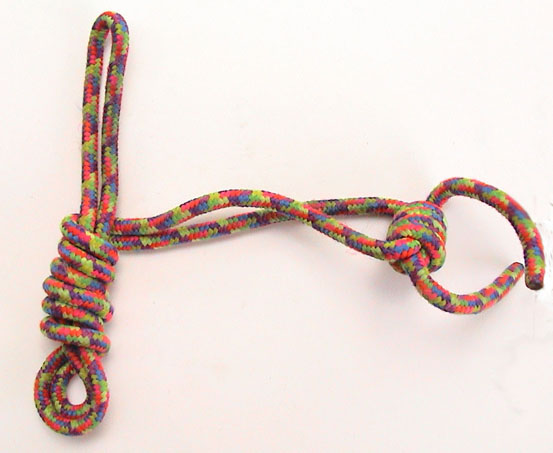
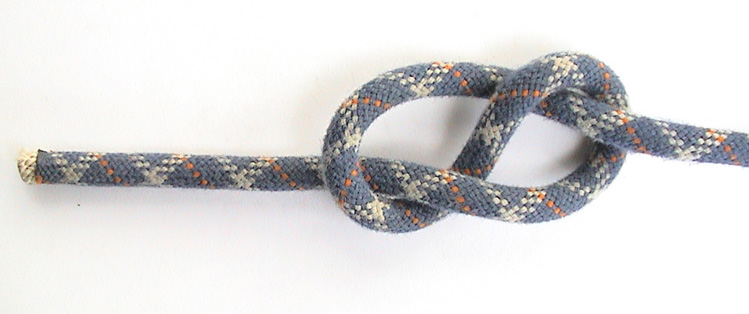
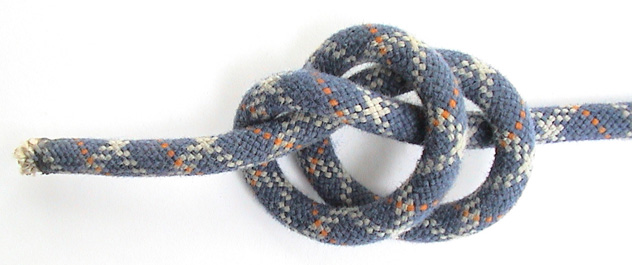
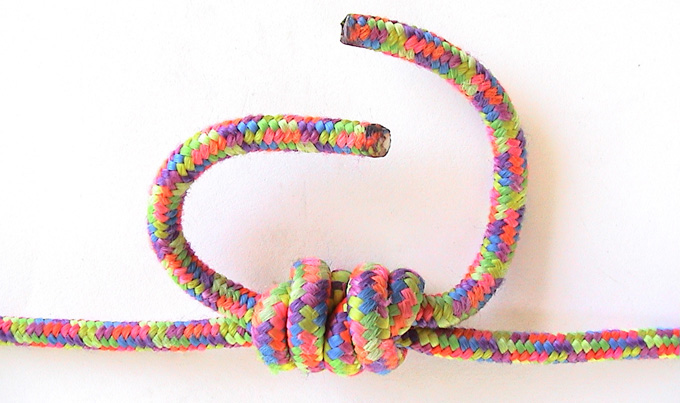
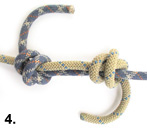
    Note: Avoid using the "Abnormal Figure Eight" (pictured left), which Bush Walkers Wilderness Rescue's research shows to be dangerous. They state: "The Abnormal Figure 8 Knot is dangerous due to roll back slippage. It is possible that this knot when poorly packed and with short tails could completely undo with loads as low as 50kgs". See Also: Abseil Knots on Needle Sports, and this accident report on rec.climbing or R&I, in which such a knot may have killed a climber.


    Double Fisherman's Push For The Summit
    Here's another way to join two ropes, the double fisherman's (pictured below). This method results in a smaller profile knot (should give less chance of stuck ropes) than the aforementioned figure eight method. Its basically just two stopper knots. Follow these steps:
    Double Fishermans, Step 1Double Fishermans, Step 2
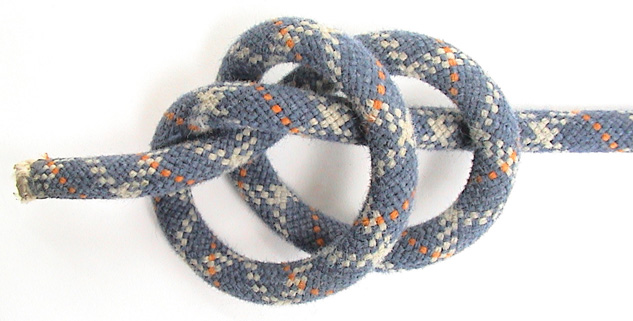
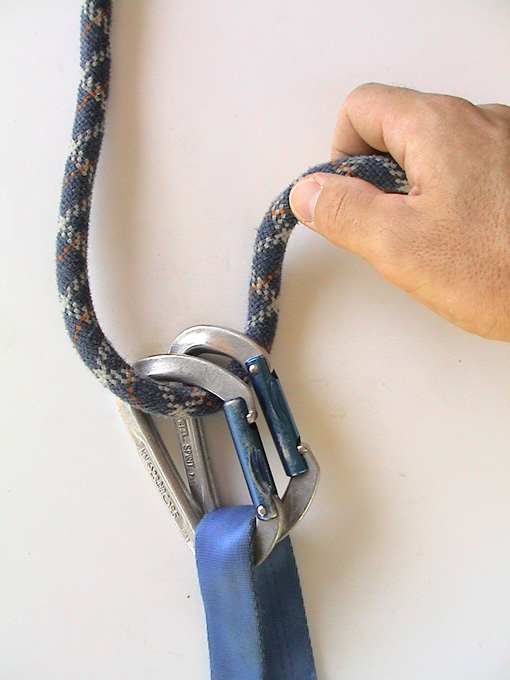
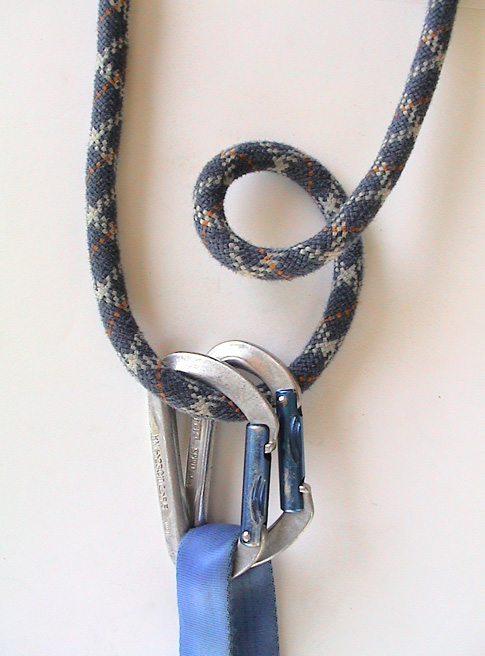
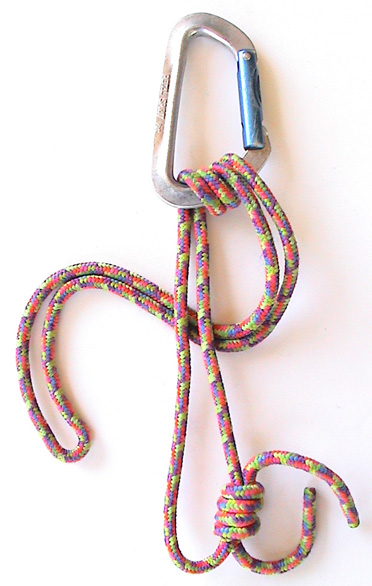
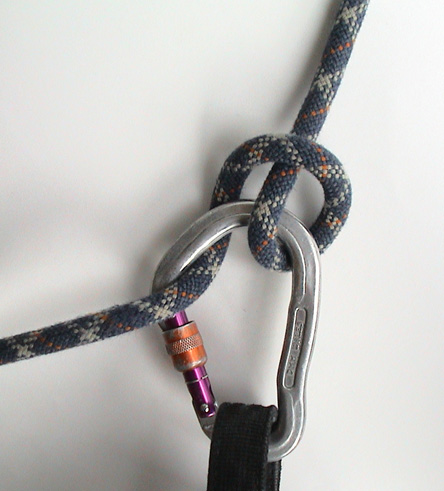
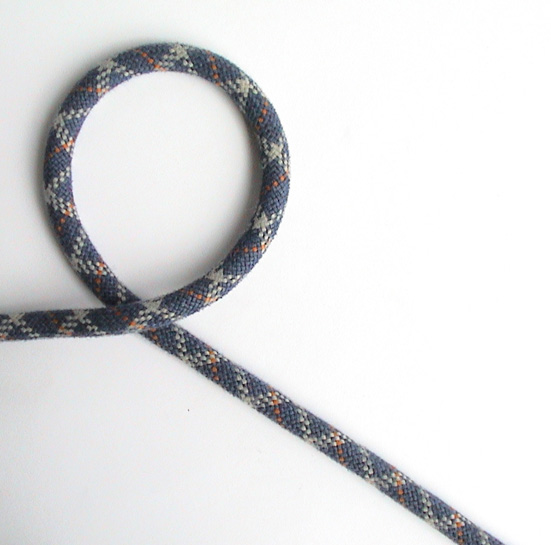
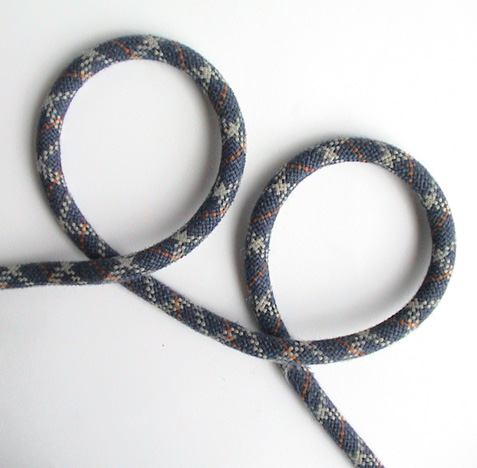
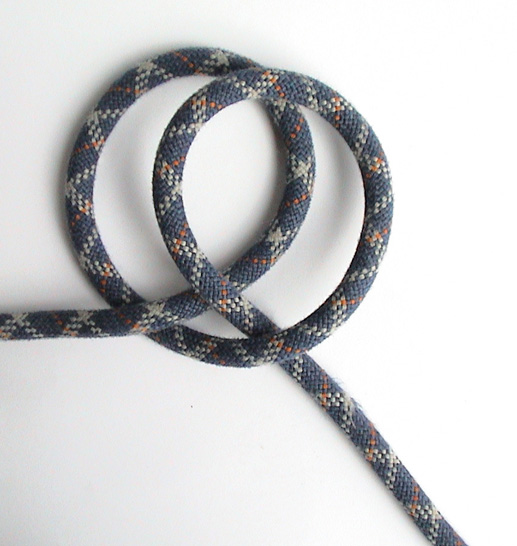
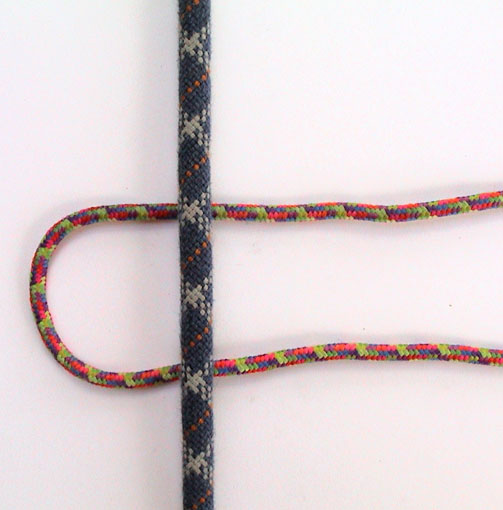
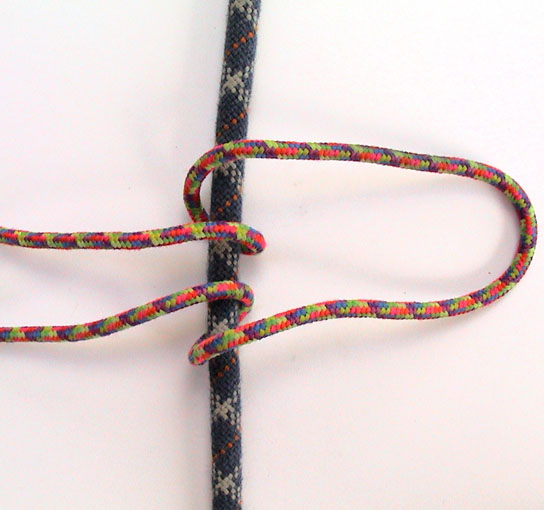
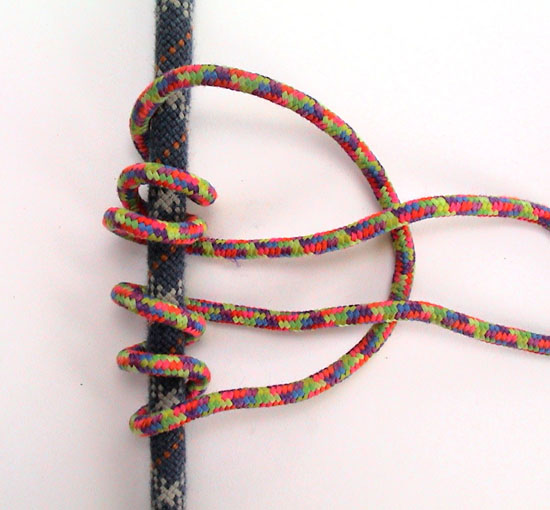
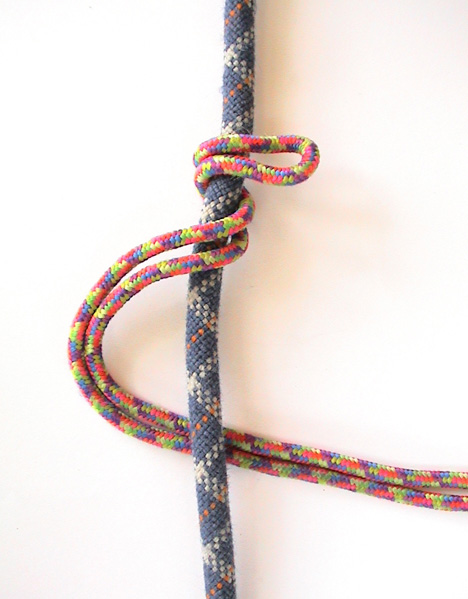
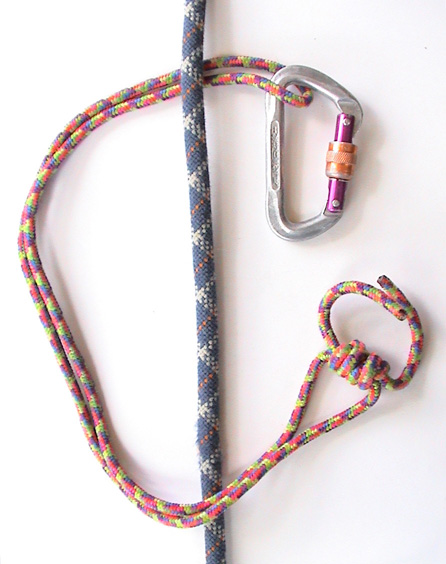
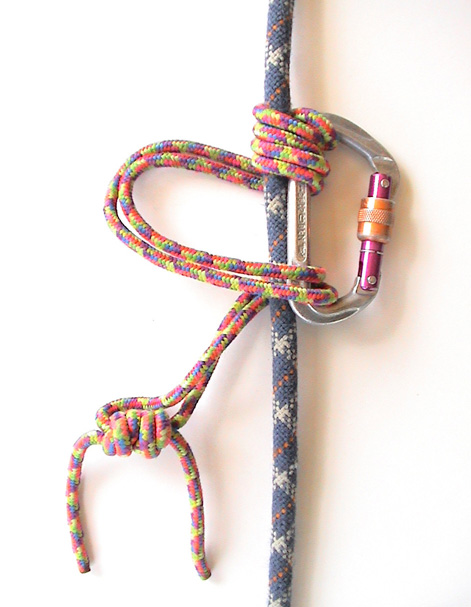
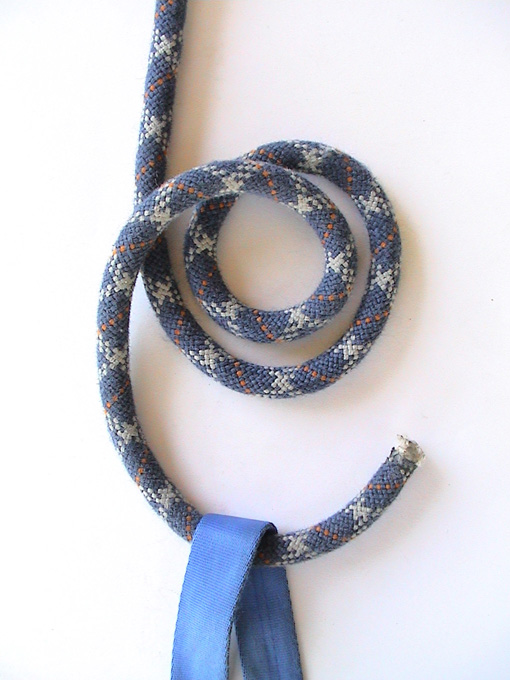
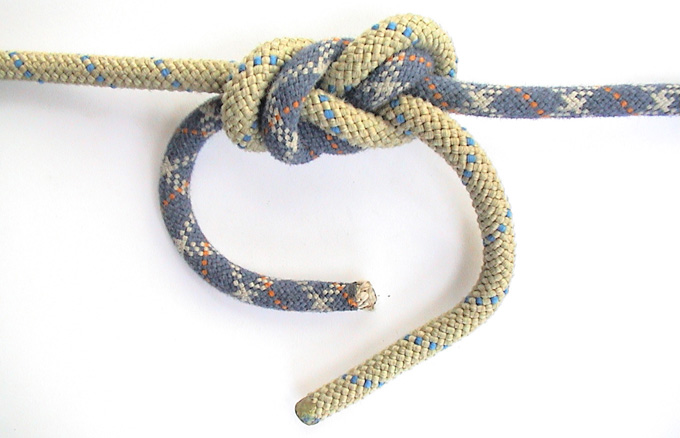
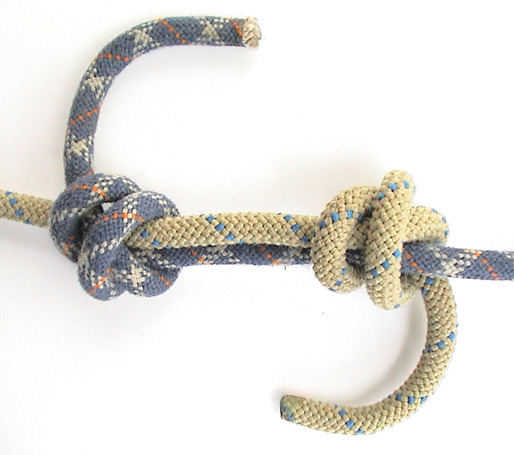
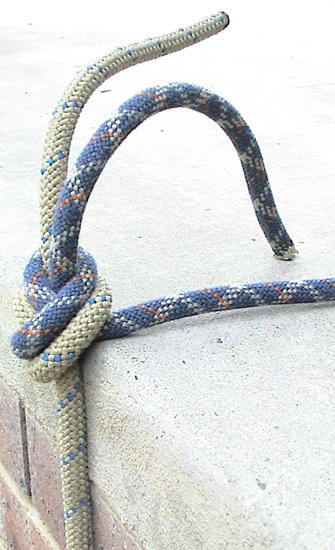
    Step 1: Put a stopper knot in the end of one rope. The trick with stopper knots is to form two loops, the second behind the first, and feed the tail back through both. Step 2: Before you tighten the knot, pass the end of the other rope through both loops as shown.
    Double Fishermans, Step 3
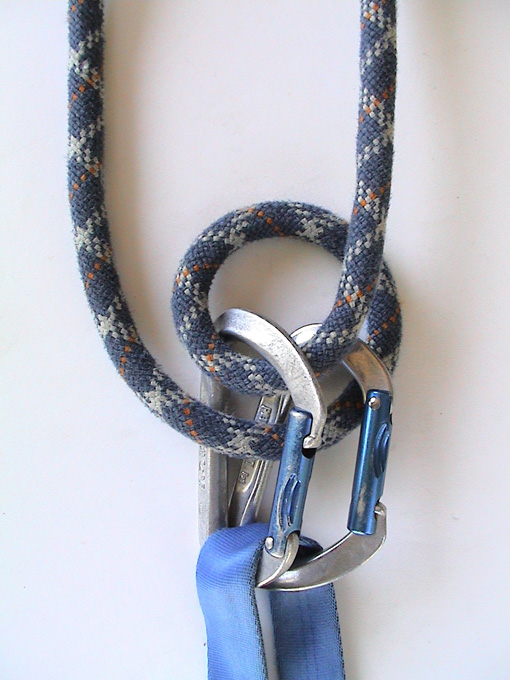
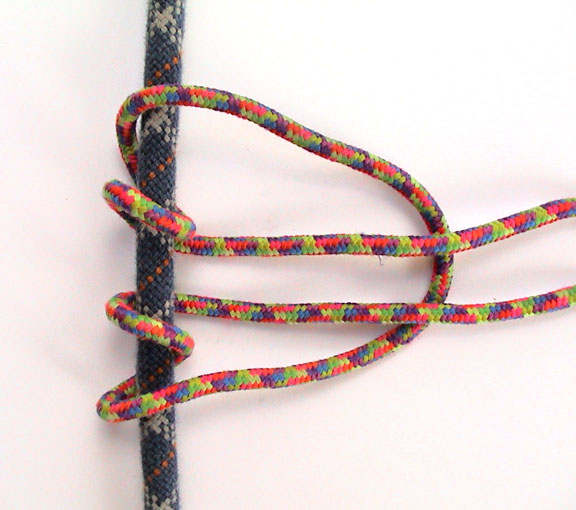
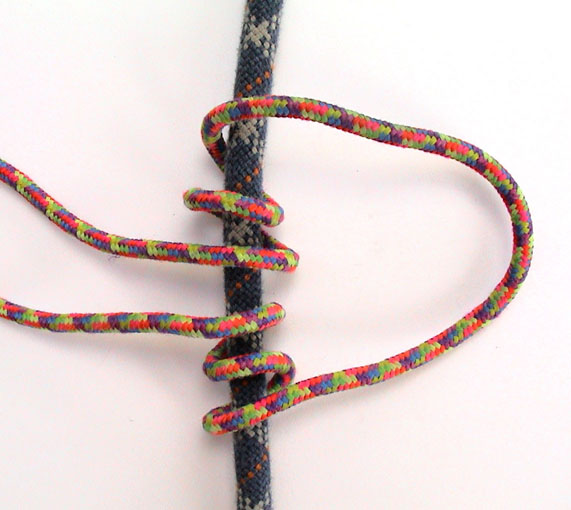
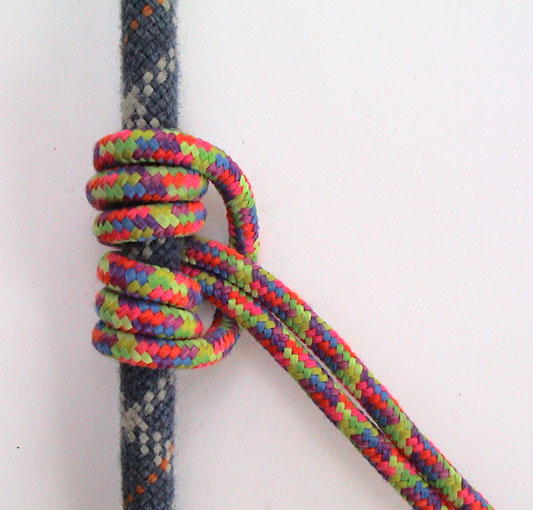
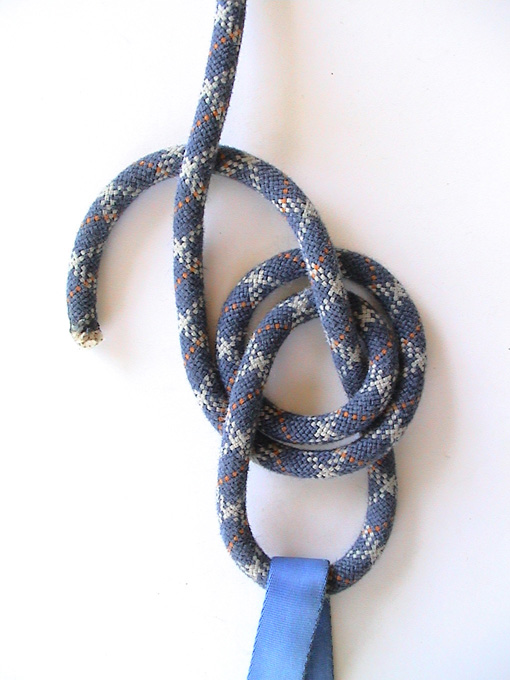
    Step 3: Now form another stopper knot, this time with the second rope, wrapping your loops around the first line.
    Double Fishermans, Step 4Double Fishermans, Step 5
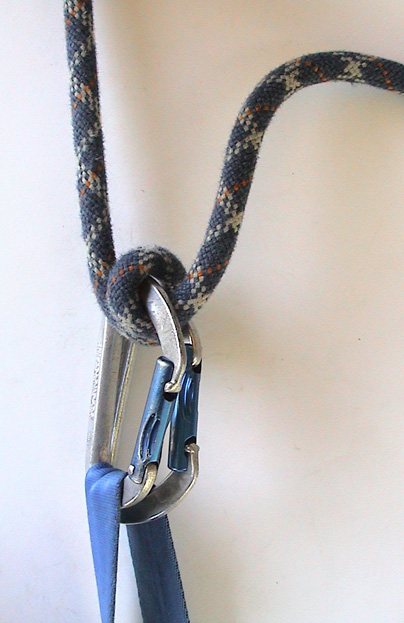
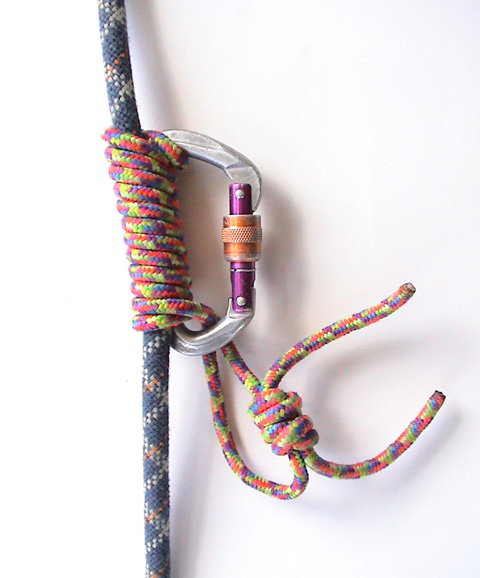
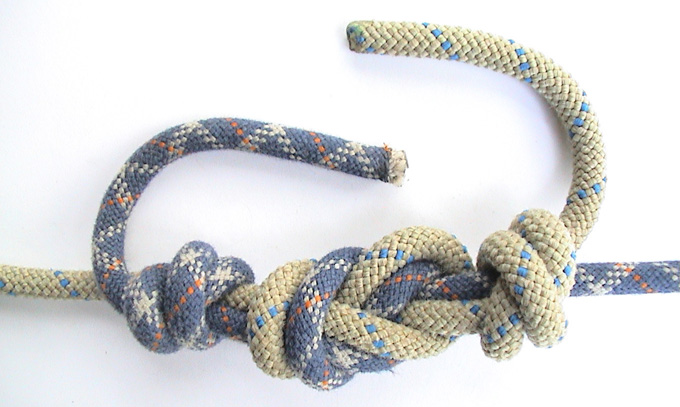
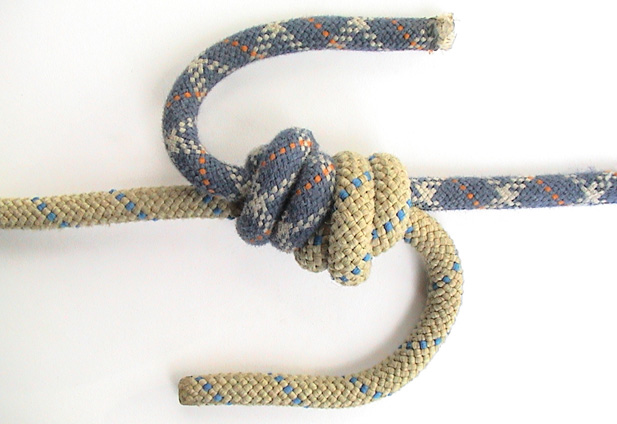
    Steps 4 & 5: Tighten both knots and draw them snug against each other. Leave plenty of tail (probably more than pictured), to account for any slippage.Double Fishermans In Accessory Cord

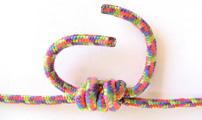
    It's hard to describe in words. Be very sure you've got it right before abseiling down. I strongly suggest you get someone experienced to teach you this knot, in person, so they can verify you've got it right. The consequences of a mistake, when using this knot to join two ropes for abseil, are naturally going to be very serious indeed. Furthermore, its easy to stuff this up, especially if its cold, dark and wet and you're looking to bail in a hurry, so perhaps this is not the best method to employ, though it certainly works if done correctly. The knot can also be difficult to undo once you've weighted it.

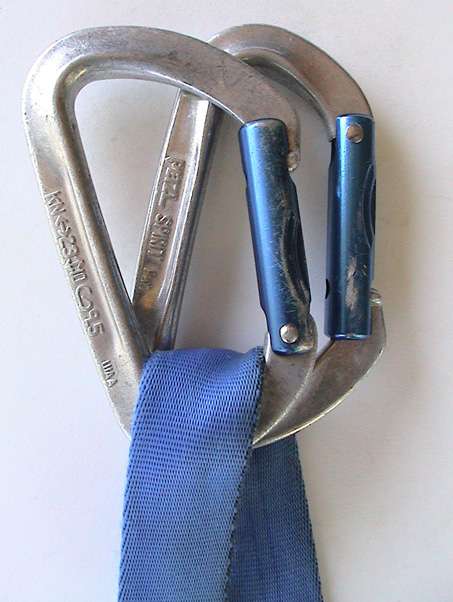
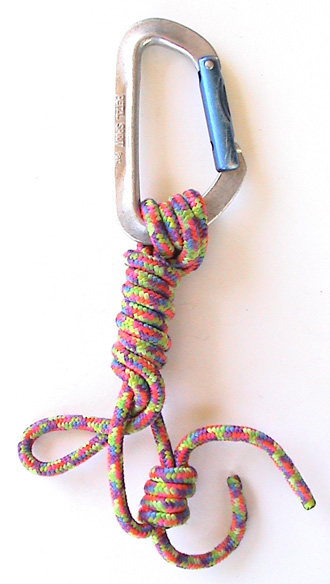
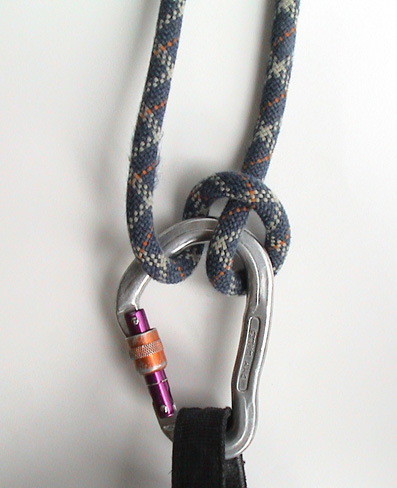
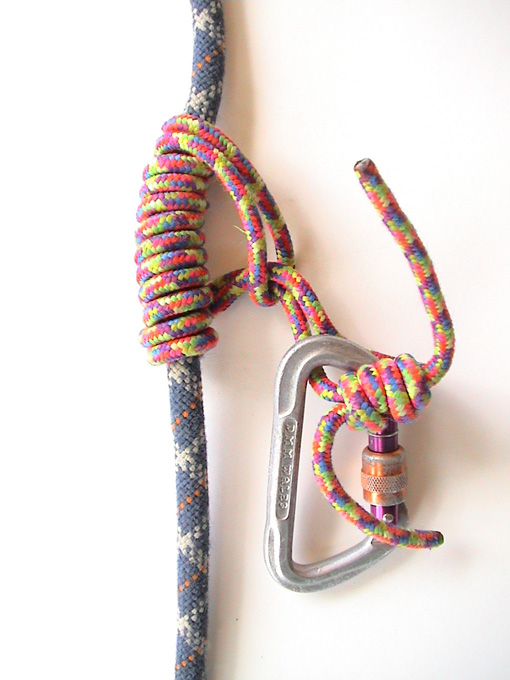
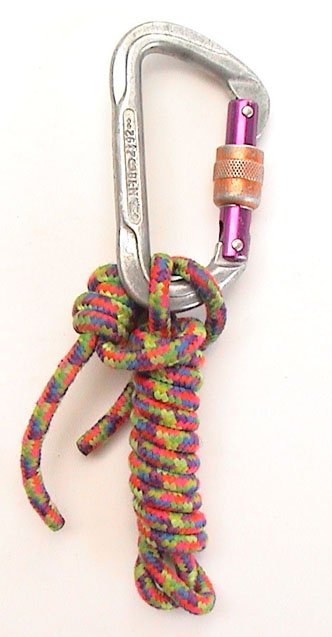
    Above Right: The double fisherman's used to join the ends of some accessory cord to form a loop, suitable for friction knots such as the Prusik, etc.


    Overhand KnotOverhand Knot (Click To Enlage) Push For The Summit
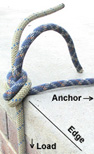
    The overhand knot is probably the simplest and fastest knot you can form to join two ropes together for abseil. This can be very handy in situations where speed is critical to safety. It's also generally believed to be the least likely knot to get stuck when the ropes are pulled. But how scary does it look? Even with the recommended super long tails, the knot can take some getting used to.

    The theory with this knot is that it will slide flat against the rock and flip over an edge rather than jamming. (See picture right, and check out Petzl's page explaining the concept).

    Follow these steps to form an overhand knot to join two ropes:
    Overhand Knot, Step 1 (Click To Enlarge)Overhand Knot (Click To Enlarge)
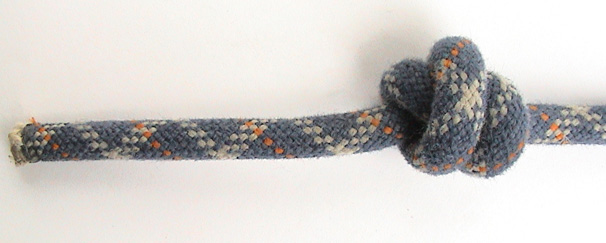
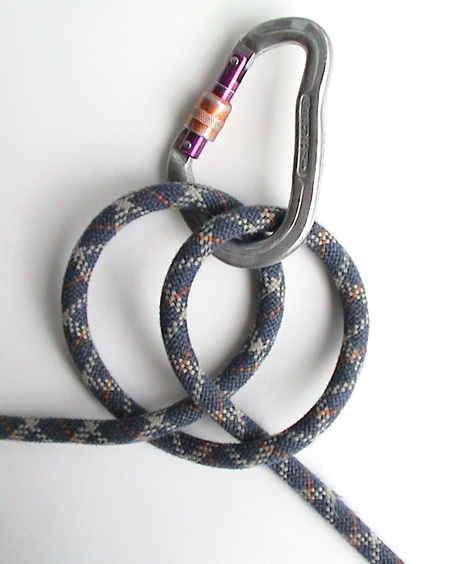
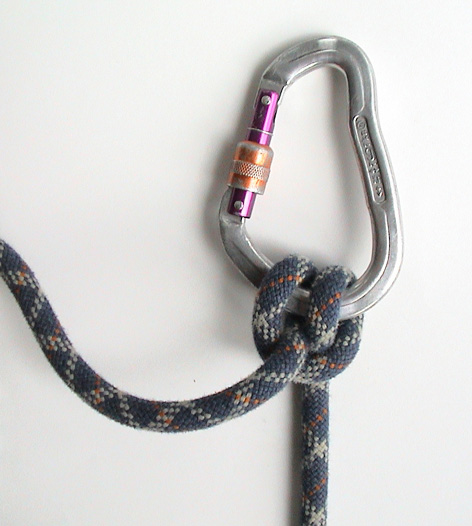
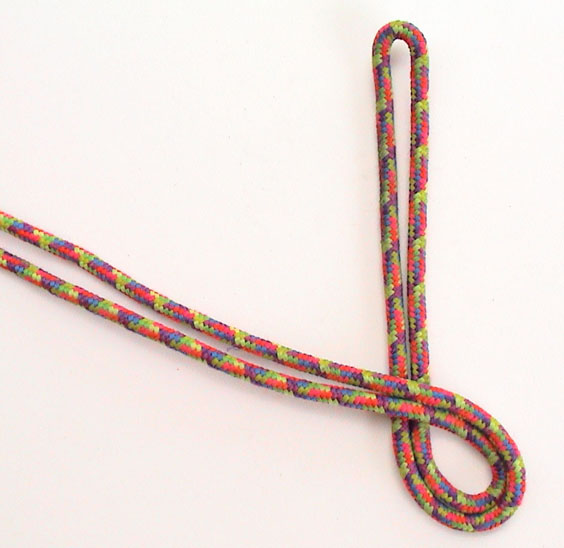
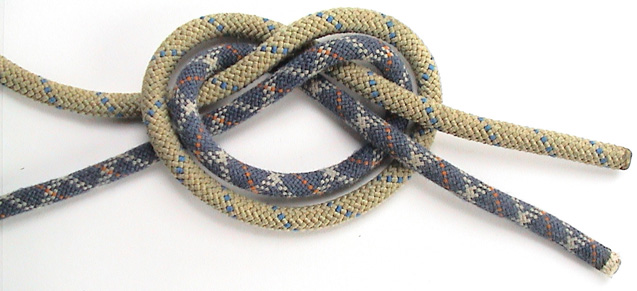
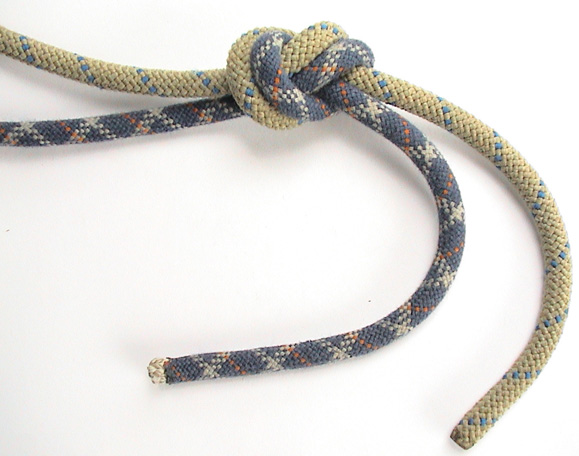
    Step 1: Grab an end of each rope and form the simple pass shown above. Step 2: Pull tight, leaving a large amount of tail (ie. about a metre) for both ends, to account for any slippage. It shouldn't slip too greatly if the ropes are of the same diameter, but this is not something to skimp on. You should probably leave more tail than the pictures above imply.

    Note comments such as "The Overhand Knot should not be used on tape due to progressive cyclic slippage." and "There may be an issue with the strength of the Overhand Knot when used on older rope.", appear in research articles from the Bush Walkers Wilderness Rescue.

    Read more »

     
    Cheap Web Hosting | Top Web Hosts | Great HTML Templates from easytemplates.com.