Selasa, 30 Desember 2008

Avoiding The Infamous Self Unclipping Quickdraw

Correctly Clipped (Click To Enlarge)

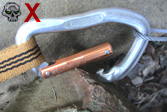
Sport and Trad climbers alike should be well aware of the need to avoid back clipping quickdraws. Just in case you've forgotten, here's a quick reminder. The basic concept is to try and keep the rope running along the spine of the carabiner (correct clip shown right) when moving left or right of the placement, so that during a fall the rope will not be in danger of landing across the gate. This becomes more of an issue with bent gate carabiners and climbs that wander around rather than being straight up. The incorrect clip is shown below:
Death Clip (Click To Enlarge)Death Clip (Click To Enlarge)Death Clip (Click To Enlarge)
Figure 1: Note, the climber's direction of travel. He is moving upwards, but angling from the right of the draw to the left of it. Figure 2: A fall flips the rope over the gate of the carabiner. Figure 3: Self unclip!

Another means of avoiding the self unclip would be to rotate the carabiner through which the rope passes, such that the gate opening instead resides at the top. Also the usual cautions regarding carabiners should be mentioned, such as avoiding placements where protruding rock features threaten to open the gate, and avoiding loading the carabiner over an edge.
Do not load carabiner over an edge (Click To Enlarge)Avoid protruding rock features that might open the gate (Click To Enlarge)
Above Left: Do not load carabiner over an edge. Above Right: Avoid protruding rock features that might open the gate.

sumber: http://www.chockstone.org/TechTips/Unclip.htm

Read more »

Avoiding The Infamous Self Unclipping Quickdraw

Correctly Clipped (Click To Enlarge)

Sport and Trad climbers alike should be well aware of the need to avoid back clipping quickdraws. Just in case you've forgotten, here's a quick reminder. The basic concept is to try and keep the rope running along the spine of the carabiner (correct clip shown right) when moving left or right of the placement, so that during a fall the rope will not be in danger of landing across the gate. This becomes more of an issue with bent gate carabiners and climbs that wander around rather than being straight up. The incorrect clip is shown below:
Death Clip (Click To Enlarge)Death Clip (Click To Enlarge)Death Clip (Click To Enlarge)
Figure 1: Note, the climber's direction of travel. He is moving upwards, but angling from the right of the draw to the left of it. Figure 2: A fall flips the rope over the gate of the carabiner. Figure 3: Self unclip!

Another means of avoiding the self unclip would be to rotate the carabiner through which the rope passes, such that the gate opening instead resides at the top. Also the usual cautions regarding carabiners should be mentioned, such as avoiding placements where protruding rock features threaten to open the gate, and avoiding loading the carabiner over an edge.
Do not load carabiner over an edge (Click To Enlarge)Avoid protruding rock features that might open the gate (Click To Enlarge)
Above Left: Do not load carabiner over an edge. Above Right: Avoid protruding rock features that might open the gate.

Read more »

Senin, 29 Desember 2008

Cordelette For Equalising Anchors

You're leading the last pitch. It's been a long day and now the sun is setting. Topping out you glance around for potential belay anchors. The trad options aren't obvious. Ten minutes later you're still dicking around, shortening slings, shifting clove hitches, tying off portions of the climbing rope. It's a mess and the damn anchors still don't look equalised. What's more that comfy seat has a spike of rock that is threatening your future plans for fatherhood. No time to shift it now.... "On belay!"

If only there was a faster, simpler way? Well there is. Enter the "cordelette". It's hardly a new concept, and despite the ease with which it can equalise anchors the cordelette is still, somewhat surprisingly, not yet on everyone's rack. For trad multi-pitch I carry two, one for the belay at the bottom of a pitch and one for the belay at the top.

Above Right: A cordelette made from 6 metres of 7mm accessory cord and twist racked. Below Right: The "Eyes" of a snake cordelette made from webbing.

"Eyes" of the Snake Webelette (Click To Enlarge)The cordelette is just a large sling, 6 or so metres in length. To create one on the cheap it can be made from 7mm or thicker accessory cord (perlon) tied in a loop with a triple fisherman's knot (as for double fishermans, but with an extra stopper knot on each side). A little dearer you could also use, for example, 5.5mm Blue Water Titan (spectra) cord. The disadvantage with cord is that it can become twisted (pig tailing), fairly easily and depending on the cord you use can present a reasonably bulky profile on your rack. Also the knot forming the loop can sometimes get in the road. Mountain Tools Webolette.Metolius Equalizer Super Sling

To alleviate these concerns, my preference is to purchase a pre-sewn cordelette made from super strong tape or webbing, just like a large (6m or so) sewn sling. These come in two versions, the normal sewn loop or my personal favourite the "snake", which rather than being sewn in a loop is left as a single length but with "eyes" (pictured right) sewn on each end. The "snake" provides that extra distance over the loop, giving you more bang for the buck - important when your anchors are not so close together. The snake also means you have less strands to deal with.

Above Left: Some examples of the "Snake" concept are the one from "Vertical" a Western Australia manufacturer (See: Rock Hardware), pictured above right, and the "Mountain Tools Webolette ®" (Image curtesy of Mountain Tools ®, See: Their Webo-what? page), and "Metolius Equalizer Super Sling" pictured above left.


Equalising Anchors With A Cordelette Push For The Summit

One important feature of the cordelette is it's ability to speed up equalising anchors for a belay station. Rather than stuffing around with slings of varying lengths and tied off portions of the climbing rope, you simply follow these steps:
CordeletteStep 6 (Click To Enlarge)
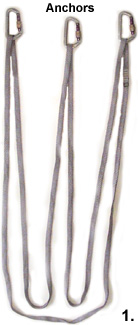
Step 1: Loop the cordelette through each anchor in the fashion shown above. Step 2: Grab the loops at the bottom and pull them all tightly together letting the strands slip through your fingers so that they come together at one central point. Locate this point, suitable for the belay, at the appropriate place in three dimensional space such that it will be lined up with the direction of the load.
Step 2 (Click To Enlarge)Step 4 (Click To Enlarge)Step 5 (Click To Enlarge)
Steps 3 to 5: Form a figure eight on a bight, or the over-hand knot shown above, and clip to the load. The overhand uses slightly less material, handy if you're running short, however the figure eight should be slightly easier to untie after it's weighted.

As well as fast equalisation, another major benefit of using a cordelette, knotted as shown, is that it effectively ties off each anchor, offering very little extension if one of the anchors fails. Obviously the system relies on the direction of the load being known beforehand. You will need to untie & retie the knot to shift the belay to a new position. However, you're only moving one knot, instead of a whole mess of slings. Much simpler! If it's not safe to untie the central knot, you can take up slack on any given arm of the cordelette by temporarily unclipping that arm from it's anchor and adding a figure eight or over hand knot, just as you would have done to shorten a sling.

Note this article does not discuss how to create a suitable belay station. The pictures above are obviously vastly simplified for the purpose of illustration. Often you might need a fourth anchor, independant of the cordelette, to hold an upwards pull, for example. Or you might need to extend one arm of the cordelette to avoid using trad placements all in the same rock feature. Note, also that the angle between anchor points should not be greater than about 90 degrees or the whole point of equalisation will work against you rather than for you. (See: Equalising Anchors).


Racking Your Cordelette Push For The Summit

One way to rack your cordelette is to fold it in half, then half again, and half once more, or until it's down to a manageable size, then twist it up, as in the steps below:
Step 1 (Click To Enlarge)Step 2 (Click To Enlarge)
Step 3 (Click To Enlarge)Step 4 (Click To Enlarge)Step 5 (Click To Enlarge)
Step 1: Fold in half, again and again until it's small enough. Don't let go of the tails. Steps 2 & 3: Twist the remaining material a few times until it presents as small a profile as possible. Steps 4 & 5: Clip to a large carabiner and it's ready to go on your rack.

sumber : http://www.chockstone.org/TechTips/Cordelette.htm

Read more »

Equalising Anchors

Equalising anchors correctly reduces the potential load on each anchor by distributing the weight. This is a very useful tool, making two equalised anchors far superior too two anchors set in series. Two anchors that by themselves may not hold much of a fall, when combined correctly may well be stronger.

However, when equalising anchors you should NOT spread them too far apart or the concept of equalisation will actually work against you rather than for you. The diagram below shows that the reliability of the anchors decreases the wider they are spread apart.

Below: An 80kg load clipped to two equalised anchors. (Source AMGA 1992 manual).

40kgs

40kgs

43.2kgs

43.2kgs

56kgs

56kgs

80kgs

80kgs

Anchors spread 20 degrees apart Anchors spread 40 degrees apart Anchors spread 80 degrees apart Anchors spread 120 degrees apart
50% Load on each anchor 54% load on each anchor 70% load on each anchor 100% load on each anchor

With the anchors set 160 degrees apart the load on each anchor jumps to 290% meaning that in the above example of an 80kg load, each anchor is actually taking a huge 232kgs! Also with widely spread anchors, slung in the fashion shown above, you are loading the carabiner poorly. I believe the term is tri-axle loading. As a general rule, try not to spread your anchors wider than 90 degrees. Two anchors equalised with the rope


Equalising Two Anchors With The Rope

When leading, and equalising anchors at a belay I recommend using a cordelette. If you do use the rope, consider such knots as the In-line Figure Eight, which can be easily elongated to balance the load. Or check out the Bunny Ears. For top roping I suggest a 25m length of static rope (say 11mm), rather than a cordelette, because it will be more durable in the long term.

Right: Two anchors equalised with the rope. The first anchor is tied off with a figure eight on a bite, while the second anchor is clipped to an In-line Figure Eight, whose protruding loop has been easily adjusted to equalise tension of the load between both anchors.


Equalising Two Anchors With A Sling

(Click To Enlarge)
Death Triangle (Click To Enlarge)Step 1: Clip the anchors with a large sling. You could clip a carabiner to your load, through both strands of this set up, but what would happen if one anchor failed? The result would be total failure.

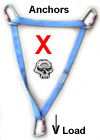
Also Note: Avoid using the "Death Triangle" pictured right. Rather than distributing the load this actually puts a greater force on the system due to the same "wide spread" principle as explained above.

Twist before clipping. (Click To Enlarge)(Click To Enlarge)
Step 2: Far better to put a twist in one strand. Step 3: And clip the load to both strands as shown. You can move the carabiner horizontally at will to adjust it to the best postion.

This way should one anchor fail the system would still be in contact with the other anchor. However it would extend a great deal, badly shock loading the remaining anchor. And what if the sling itself tore? The whole system would fail.

Called the "Sliding X", this is set up is not recommended in most situations, instead, continue to step four below.

(Click To Enlarge)
Step 4
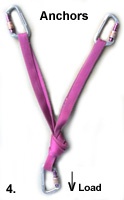
: One way to solve the problem is to instead put an overhand knot in the sling strands, and clip this to the load as shown.

This way if one anchor fails, or the sling tears above the knot, then the second anchor will be loaded with little or no extension.

This is not the only way to equalise two anchors with a sling.


sumber : http://www.chockstone.org/TechTips/Equalise.htm

Read more »

Hauling The Second Past The Crux

This section describes two methods the leader might employ to haul his/her second up past the crux or even up the entire pitch to the belay. This is an advanced topic and I strongly suggest you get someone experienced to show you these methods, in person, so they can verify your technique. I repeat, do not trust what you read here, I make no claim that it's accurate. (See full disclaimer).


Assisted Hoist
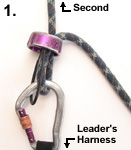
"Dude, I'm stuck on the crux!". Halfway up a multi-pitch climb the cry is heard. You're the leader bringing up a second. What to do? One solution is to haul his fat ass over the crux moves using an assisted hoist. This will only work if you have enough spare slack in the rope being used to belay your second. You'll need twice the spare rope as the distance down to your second. So for a long pitch your second will need to be nearing the top. Furthermore, this may not be a good idea if the route traverses (rope drag) or you can't even see your second. Never-the-less, once you've determined it's a valid option, perform these steps:
Step 1 (Click To Enlarge)
Step 2 (Click To Enlarge)Step 3 (Click To Enlarge)
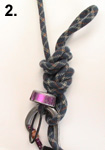
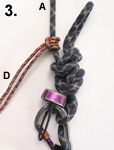
Step 1: Leader is belaying up the second from above. In this example the belay is off the leader's harness, but the method is the same for a belay off the anchor. Step 2: Tie off the belay. This is a topic in and of itself, and I won't go into it here. In this example I've used two overhand knots, however there are numerous methods. Many use a mule knot with an overhand backup. Pick a method that is quick, simple and safe. Step 3: Attach a prusik, or autoblock backup (D) to the taut line (A), and clip to your belay anchor. Use a short loop of cord to make the prusik. The shorter the better, because you want it snug against the belay device, not slipping down the taut line and getting in the road. The autoblock knot can be moved when weighted, which can be handy in this situation, but I've had no trouble with a prusik knot for this purpose.
Step 4 (Click To Enlarge)Assisted Hoist (Click To Enlarge)
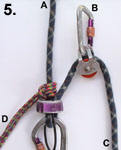
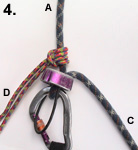
Step 4: Carefully release the tie off, in such a manner that you still have full control of the belay, and slowly let the prusik take the weight. Ensure that the prusik is sitting correctly and holding the full load before proceeding. Step 5: Clip a locking carabiner (B) to a loop of slack rope (pulley optional), and toss it down to your flailing second. On less than vertical routes it helps if there's some weight to the carabiner being lowered. Your second clips the carabiner (B) into his harness and you both start hauling - him pulling down on the appropriate line, and you straining upwards on the slack end (C). Mechanical advantage will ensure he's a light weight to shift. You may have to loosen the prusik a tad to get underway.

Alternative: If you want to be extra safe, you can change the order a little. After you've tied off the belay, and attached the prusik back up (D) in step 3, lower the carabiner (B) on a loop (from step 5) then tie off the slack end of the rope (C), with a figure-eight-on-a-bite (not pictured) clipped to the belay anchor. This provides a final redundant backup. Then carefully release the tied off belay, adjust for the extra slack you now have, and once you've signalled your second, proceed to start hauling.

Make sure you don't get too enthusiastic hauling, wait for your second to clean any pro on the way up. That might sound unnecessary to mention, but if you can't see your second, or even hear them, it can become an issue. Aided by mechanical advantage you're suddenly possessed with the strength of two men. If you're not careful its possible to tear anchors right out of the rock.

Once your second has been hauled past the crux you can get your hands back into position to recommence normal belaying. Signal to your second to unclip the carabiner (B), and take up the heap of slack. Loosen the prusik a tad, and proceed with normal belaying.
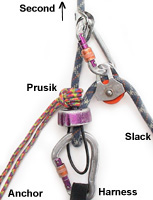
Unassisted Hoist (Click To Enlarge)
Unassisted Hoist or Z-Pulley System
When you don't have enough slack rope to do an assisted hoist, you'll have to use a z-pulley or unassisted hoist. (Important Note: This is really something you should seek professional instruction for, or at least get a good book on the topic). This gives you a 1:3 mechanical advantage, but it's still quite an undertaking to haul someone heavy especially if there is any rope drag. Start the same as the assisted hoist, but instead attach the loop of slack rope to the taut line (with another short prusik, or something like a Petzl Tibloc as pictured right), pulley optional, then start hauling on your own. It's a good idea to tied off the slack end of the rope using a figure-eight-on-a-bite clipped to the belay anchor, just in case.

It's hard work, and quite uncomfortable if you're doing this off your harness. You end up having to kick the slack end down with your foot to gain extra distance (Tibloc works well for this), because each haul you do only gains you 1/3rd of actual upwards movement. If you had to haul an injured climber a full rope length, or even half a rope length, in this manner it would be exhausting work. Make sure you've got all the slack out of your anchor system beforehand or you could be in danger of hurting your back.GriGri Hoist (Click To Enlarge)
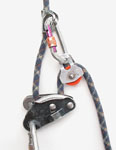
If its really hard work, or painful, you'll need to escape the belay (and possibly re-rig the system to include greater mechanical advantage), and swap the system over so you're hauling off the belay anchor rather than your harness. Escaping the belay should not be difficult since you've already got the backup prusik in place. Just make sure you've tied off the slack end well, as a final redundant backup.

When belaying a second from above (especially one likely to be hanging about) I tend to use a GriGri. This may or may not be recommend by Petzl, but I find both hoisting methods are quicker and easier when belaying with the GriGri, because the device is self locking, you eliminate the need for the prusik backup (pictured right).


Notes On Rasing The Second
Raising your stuck second is, of course, not always the best option and in many situations not even possible. On a wildly traversing route rasing them might put them at risk of pendulum falls as they clean your gear on the way up. Likewise lowering them may also not be an option, for example, a traversing or overhanging route could mean there is no where to lower them to. The second should know how to ascend the rope and have prusiks or similar gear for doing so, though this is may not help at all.

Furthermore if your second is seriously injured or even unconscious a whole mess of issues occur. I'm hardly the person to be advising on such. My experiences have been limited to situations requiring hauling a second too shagged out to pull the crux - nothing more epic than that. Get a good book on self rescue techniques (recommend: Self Rescue - Good book by David J. Fasulo), or attend a course if you wish to know more.


Reader's Feedback
"Mate if you haven't played with the Rescuescender [from Petzl] yet for hauling then you're way missing out. I tell you that in combination with a GriGri this system would be the easiest and most effective haul system to date. The Rescuescender with a pulley attached literally glides down the rope making huge resets for hauling. One can send the Rescuescender pretty much all the way down as far as you have rope to send it. Can you imagine a Rescuescender descending from above down to you as the stuck second. What this means is that you could do only one reset to get the second up almost like an assisted hoist. If you put another pulley at your anchor at the top then you'll be hauling the rope down towards you instead of pulling up." - Phil Box.

sumber : http://www.chockstone.org/TechTips/Haul.htm
Read more »

Selasa, 23 Desember 2008

Ascending The Rope

You've all seen the movie where the mountaineer is left hanging in the wind on the end of the rope, his partner unable to help. Our hero inevitably whips off his shoe laces, and uses them to ascend the rope. It makes great footage, but unless you're feeling like James Bond material, or you start using 6 or 7mm accessory cord as shoe laces, I suggest you use a more practical approach. There's probably dozens of ways to ascend a rope, but here's a few I can think of. Again, I make no claim the following is accurate, Chockstone Photography | Landscape Photography Australia | Australian Landscape Photography

Please read the full disclaimer.

Ascending With Mechanical AscendersPetzl AscensionPetzl Ascension
The standard means of ascending a rope is to use two mechanical ascenders (sometimes called "Jumars", which is just a brand name). As an example, the Petzl Ascension is pictured right. A device such as this will be handy on a big wall, or when a lot of planned rope climbing is required.

One way to use ascenders is to simply attach both to the rope, clip them each to your harness with slings, then attach something like an aider or etrier to both ascenders. Stick one foot into the appropriate rung of one aider and the other foot into the other aider, and up you go, weighting and sliding the ascenders up one at a time. There's not much point in describing it in detail, because if you have such a device you'll also have the manual.Petzl TiblocWild Country Rope Man II

You might also like to check out Phil's tips on Ascending A Rope with a Jumar and GriGri. There's quite a variety of mechanical ascender's available and not all are big like the Petzl Ascension (pictured above right). Petzl also make a "Tibloc" (pictured far right), which they claim is the worlds smallest ascender (but those teeth look sharp). The Wild Country Ropeman (pictured right) is supposed to be light and small. In any case if you've not planning on ascending, a couple of prusiks will do the job in a pinch.


Ascending With Two Friction Knots
If you not lugging around a pair of ascenders, perhaps the next most common means is to employ two friction knots (pictured right), for example, prusiks. Tie the first prusik to the rope and clip this to your harness. Tie a second prusik (perhaps from a longer loop of cord) to the rope, form a slip knot in it's tail and put one foot through the slip knot. Now simply stand up on the foot prusik and, once the harness prusik is unweighted, slide it up as high as you can reach. Sit down and weight the harness prusik once more, and then slide the foot prusik up a comfortable distance. Stand up, and repeat the whole process over and over again. It can take quite some time if you have to ascend a full rope length, and can be somewhat tiring.

As a safety precaution tie off the slack end of the rope, using a figure eight on a bite, at progressive intervals and clip to your harness. To avoid having a clutter of these knots all hanging off your harness you might choose to untie and release each previous one. Note, however, some climbers prefer the clutter to potentially getting the trailing rope snagged far below.

Ascending With One Friction Knot
It's also possible to ascend the rope with only one friction knot, you might chose to use a bachman in this case. Follow the above "two friction knot" example, except that for the foot prusik you simply wrap the rope around your shoe a few times. This is far more tedious. You could also use a Garda Hitch to replace the foot prusik. I won't go into detail, because I've never ascended the rope in this manner. Whatever you do, make sure you've got the figure eight backups in place.

Alternatives
I've had success ascending a rope over slabby terrain that was less than vertical using a GriGri rigged as for abseiling, and basically muscling my way up. I doubt it's recommend by Petzl, and is quite tiring after only a short distance, but if I need to gain a few metres in a hurry, I find it quite handy. Make sure you tie backup knots, and please don't let this give you idea's about top rope soloing. At least not without fully investigating the methods & equipment required. (See Dawn's FAQ page, if you're mad keen to TR solo).


Read more »

 
Cheap Web Hosting | Top Web Hosts | Great HTML Templates from easytemplates.com.