Tampilkan postingan dengan label Techniques. Tampilkan semua postingan

Rabu, 07 Januari 2009

Building A Home Climbing Wall


Me stuffing around on the cave roof (Click To Enlarge)
The "Woodie", or home climbing wall is a project many a climber has dreamed into existence. Late night sketches on the back of drink coasters, and avid discussions of angles, holds, size, location, and so on, has lead to many a half-hearted construction. Usually a serious attempt is only made when opportunity knocks. In my case this was gaining a friend who is a builder. He took my hastily compiled sketches, and jumble of timber and produced the result (pictured right), within a single afternoon.
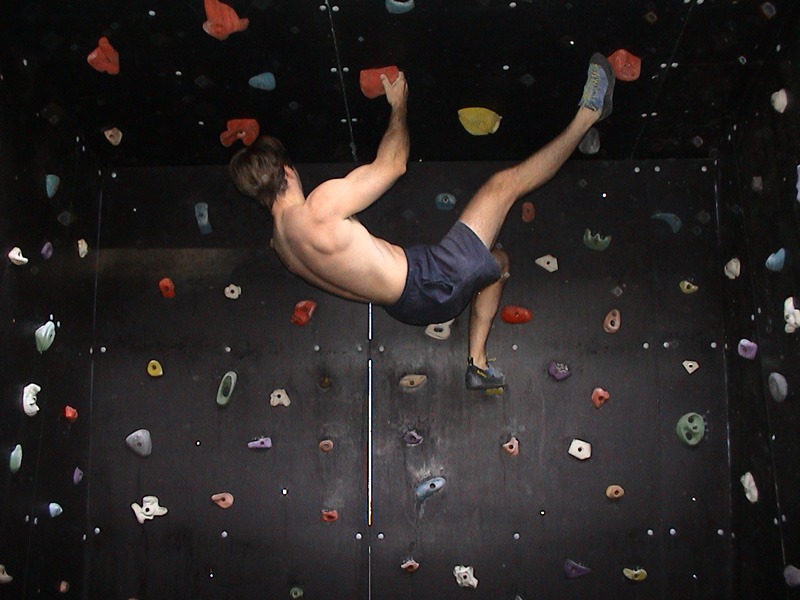
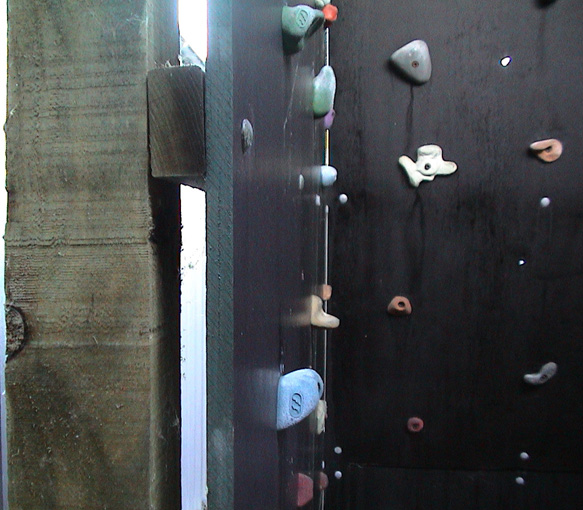
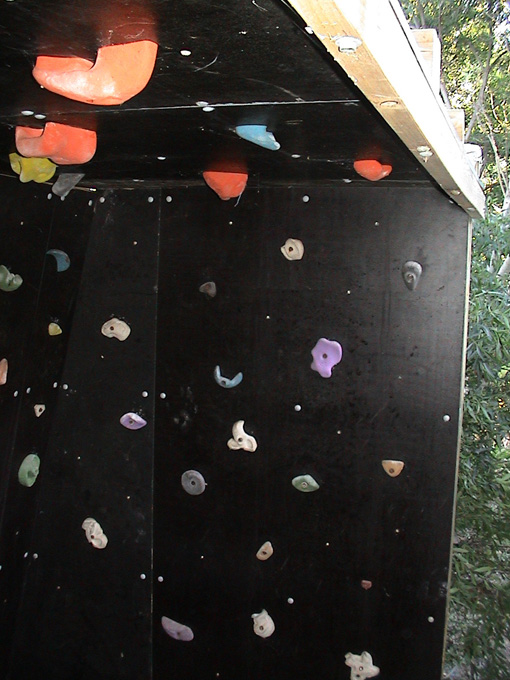
My "gym" is actually a cave, being a free standing cube (approximately 3 metres tall, and wide) with a roof and an inclined rear wall. The rear wall gets the most use because its steep gradient provides a tougher workout. The whole thing is just big enough to enjoy a free flowing bouldering session rather than being reduced to merely exercising the same moves over and over.

Top View (Click To Enlarge)

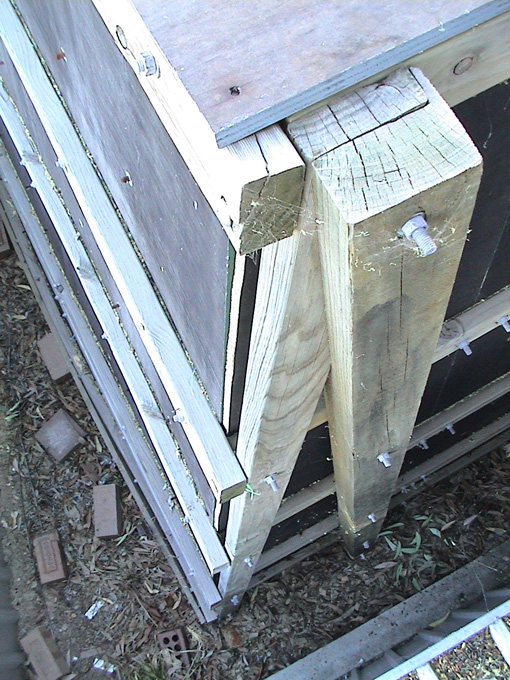
Above Right: Me mucking about on the roof of the cave. Left: View looking down from outside and above the cave, note the inclined rear wall recessed into the main vertical posts, which are concreted into the ground.Holds bolted on with T-nuts

The cave is outside, and thus incurs the full sun and rain. To battle this problem we used treated pine for the load bearing structure, galvanised bolts, and those black panels for the walls are the water proof, super strong "marine board" sheets they put behind concrete walls. Whilst they are quite expensive they can take a real beating.

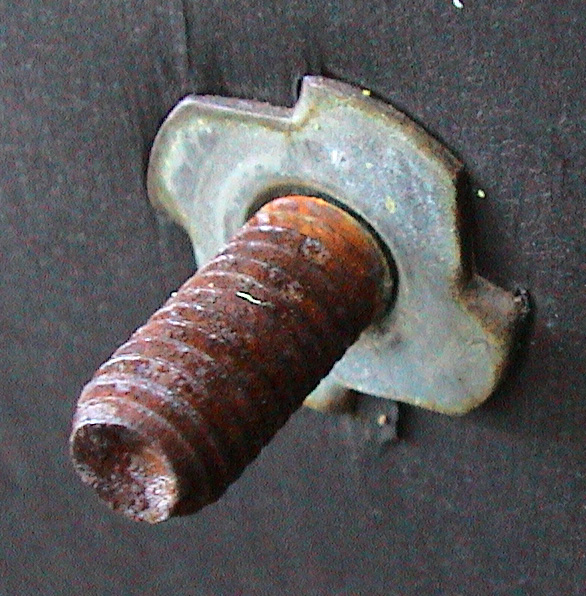
The holds are secured with T-nuts (pictured right) allowing me to move them at will from inside the cave. After a few seasons the bolts have become rusted making removal difficult, even though I used the expensive coated ones. If I was setting it up again, I'd just use cheap ordinary bolts with washers since access to the outside of the cave is easy and I don't shift the holds very often. (Click To Enlarge)

I picked up the holds at a bargain price from our local hold manufacturer because they were the "seconds" and unwanted ones from larger batches. A quick sanding with some emery paper to remove the excess resin and they're fine. The smallest footholds are about the size of a 10 cent piece and cost almost as much, then they range up to the larger roof jugs which I got for about $4 (AUD) each. If you're in the market for cheap holds, another source is the local climbing gym, who sometimes replace theirs with newer ones.(Click To Enlarge)

On the ground beneath the cave I've laid down wood chips, like they do at children's playgrounds. I've found this sufficient to cushion a fall, and less hassle than dragging an old mattress out every time I want to climb. Which brings me to another point; location. If you're looking to build a home wall, pick a location that is sheltered and easy to access. Believe it or not, but the novelty of having your own wall wears off pretty quick so the more comfortable and inviting you make it, the more likely you'll be to use it.

Size is another major consideration. My cave is just tall enough (over 3 metres on inclined wall), so that a bum start yields about four moves to the roof. Or about a dozen or so moves to traverse the three walls of the cave. If I was setting it up again, I'd make the incline wall steeper, more like 35, even 45 degrees. Or I'd look into an adjustable wall. The less wall surface you have the more of a workout you'll want to pack into that small space. A steep wall provides a pump. I've used a set of small crimps to increase difficulty, but I'd prefer more gradient.

Here's the sketches I drew up originally. We probably didn't stick to the plan completely, but it should give you an idea of the dimensions and timber required.
4 vertical posts - 3.6 m / 100mm x 100mm treated pine.
Horizontal slats - 70mm x 35mm treated pine.
2 posts at 15 degrees angle - 3.6 m / 100mm x 50mm treated pine.
All components secured in place with galvanised bolts.
Marine Board Sheets bolted to slats.
Numerous climbing holds bolted to board in a random pattern.
Marine Board on roof as well, and covered with corrugated roofing iron to protect from rain.


Of course a home climbing wall need not be as elaborate as the one shown above. The simplest ones I've heard described are bolting holds into an existing children's tree house, and one guy who claimed he bolted holds onto a dead tree - not sure how successful that was! A friend of mine has a single sheet of plywood with a metal frame, attached to chains dyna-bolted into an existing brick wall. He can vary the angle of the frame by moving up or down the chain links. The thing flexes a fair bit, but it works. Follow the links below to see more ideas from other web sites. Alternatively there are books available that go into the whole process of planning, construction, route setting and training systems in detail.

sumber : http://www.chockstone.org/TechTips.htm

Read more »

Minggu, 04 Januari 2009

Friction Knots

The Prusik Knot

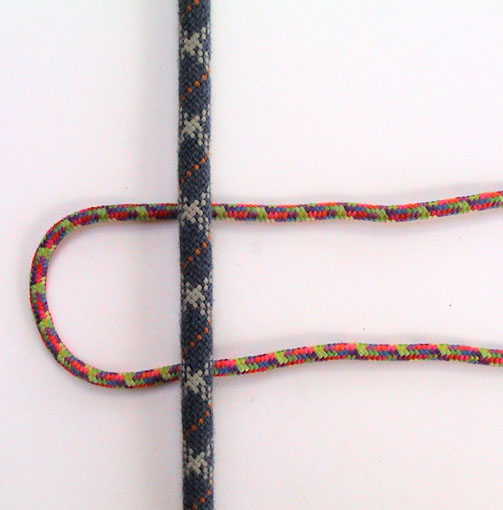
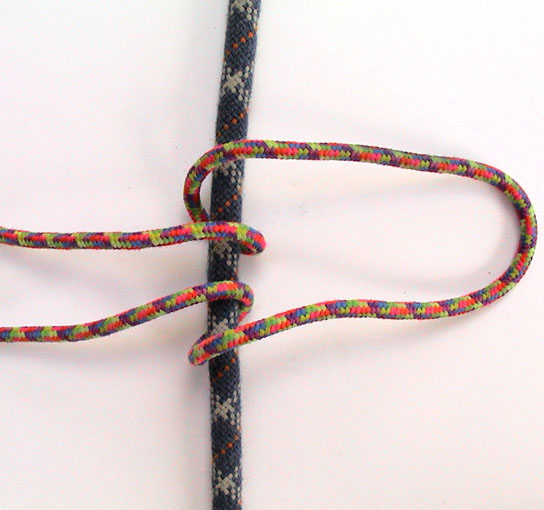
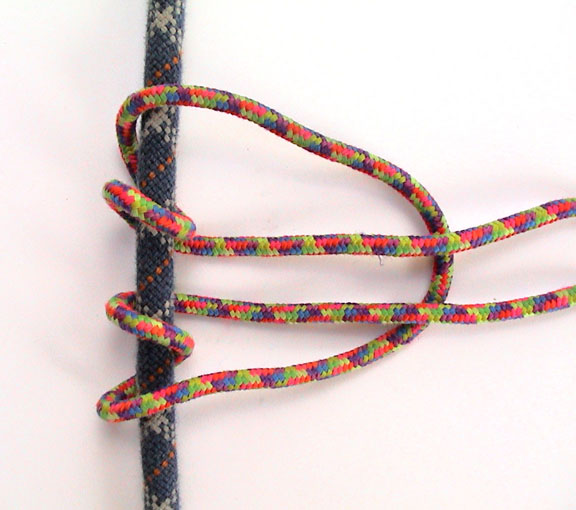
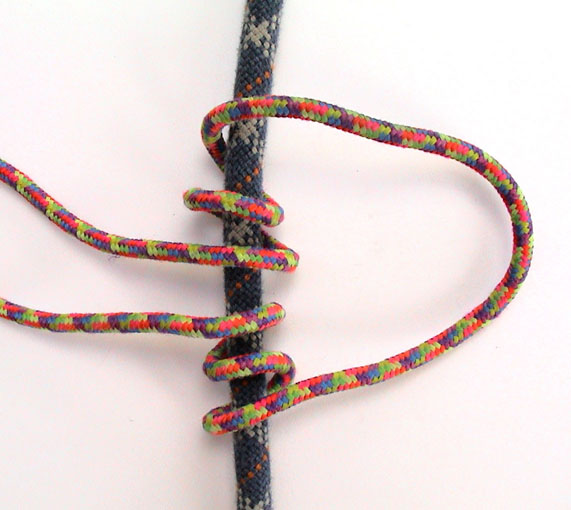
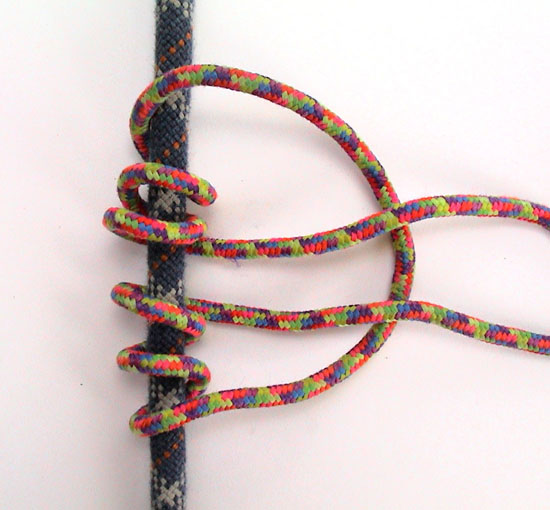
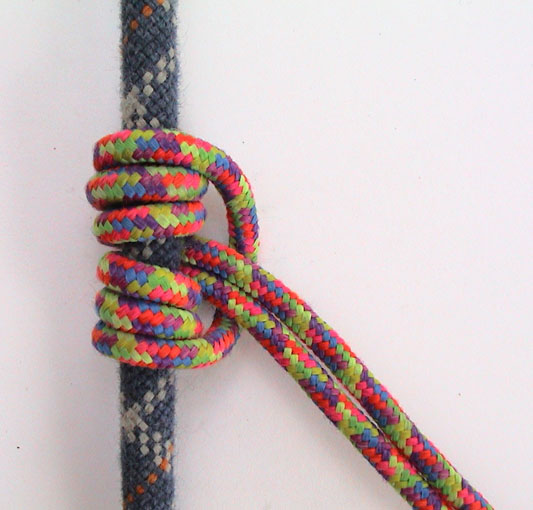
The good old prusik knot is very, very useful. All you need is a loop of cord which you can make using 6 or 7mm accessory cord and a double fisherman's knot. With one or two prusiks you can ascend a rope, or rig a z-pulley to haul up an injured climber, or backup an abseil. Suffice it to say it's worth learning this gem of a knot. There are numerous variations on the prusik such as the "autoblock", but follow these steps to tie the standard prusik knot:
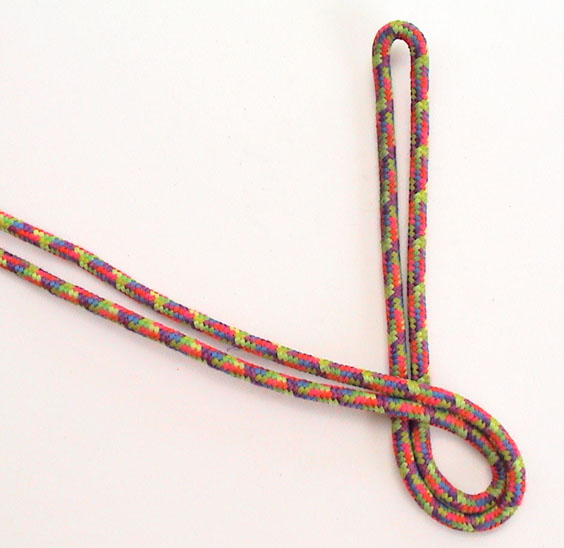
Step 1 (Click To Enlarge)Step 2 (Click To Enlarge)Step 3 (Click To Enlarge)
Step 4 (Click To Enlarge)Step 5 (Click To Enlarge)Step 6 (Click To Enlarge)
As you can see you simply wrap the loop of cord around the rope going through the inside of each previous wrap. The more wraps the "grippier" the knot. Three wraps is generally enough. Step 6: Pull the knot tight, neaten up the wraps and use the tail loop to clip into. Leaving the knot a little loose it can be slid up and down the rope. Weight the knot and it will grab the rope and lock off. Note: this form of prusik knot can sometimes be difficult to loosen once it has been tightened by the weight of a climber.


The "Klemheist" and "AutoBlock" Knot
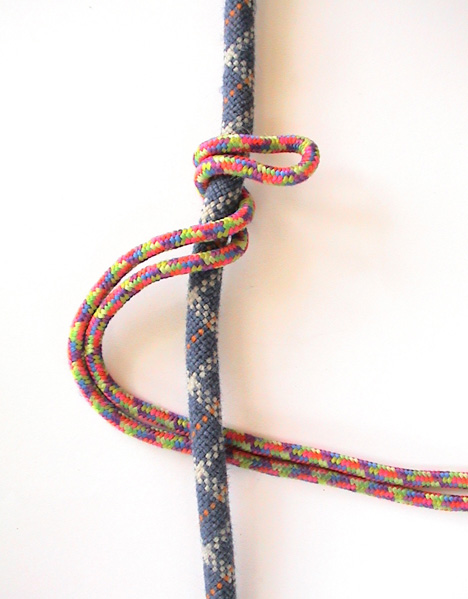
The difference with the Klemheist (also called "Machard", or "French Prusik") compared to the normal Prusik is that it can be moved once weighted and will work with webbing as well as cord. This can be very handy in certain situations. Follow these steps to tie a Klemheist:
Step 1 (Click To Enlarge)Klemheist (Click To Enlarge)
Step 1: Simply wrap a loop of cord around the rope several times. Step 2: Feed the bottom tail through the top tail and clip bottom tail with your load.

The "Autoblock" is essentially the same knot as the Klemheist, except that in the last step you simply clip both tails together with a carabiner, rather than feeding one through the other.


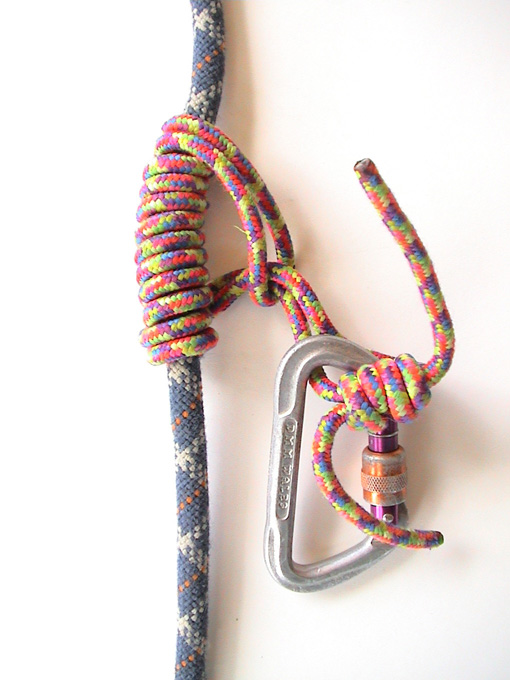
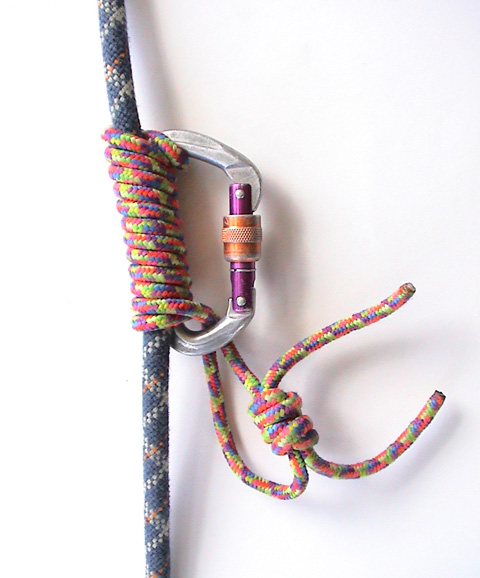
The Bachman Knot
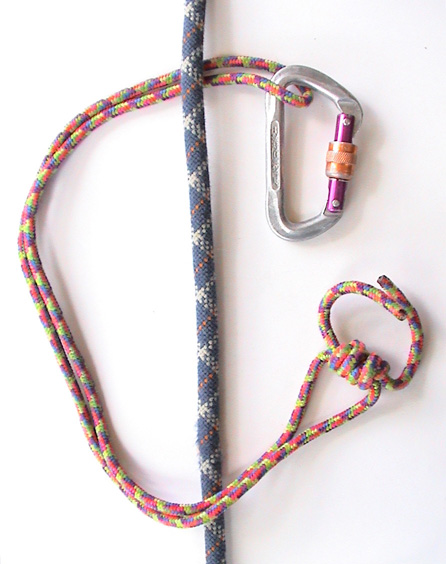
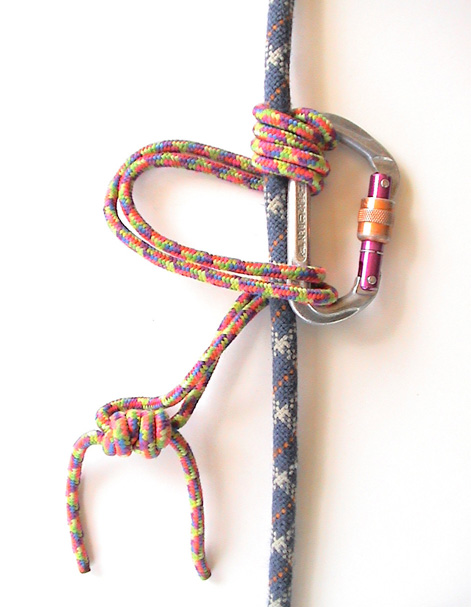
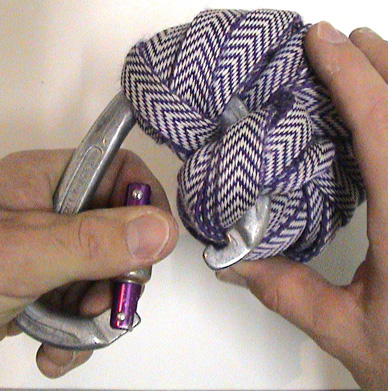
This knot makes use of a carabiner as a handle to ease shifting the knot up and down the rope. Note if you pull down on the carabiner, it will unlock the knot, moving it downwards. Likewise yank the carabiner upwards to shift it in that direction. This knot is not so good on icy ropes. Follow these steps to tie a Bachman knot:

Step 1 (Click To Enlarge)
Step 2 (Click To Enlarge)Bachman (Click To Enlarge)
Steps 1 & 2: Clip your loop of cord through a carabiner and begin wrapping the cord around the rope, feeding it through the carabiner with each pass. Keep the wraps nice and snug. Step 3: Allow the tail of the cord to hang down (as pictured), and clip your load to this protruding tail. Do not clip your load to the carabiner functioning as the "handle".


One Method Of Racking Your Accessory Cord
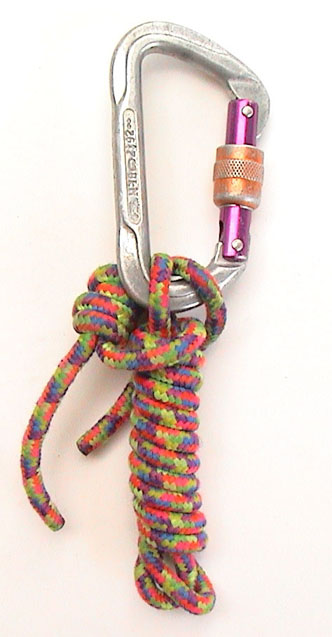
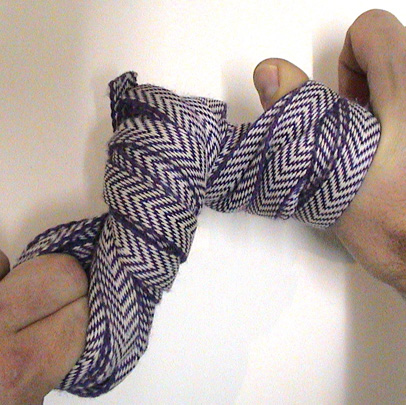
Here's one way to rack your prusik cords so that they have a small profile on your harness gear loops. Simply twist the cord about it self. Follow theses steps:
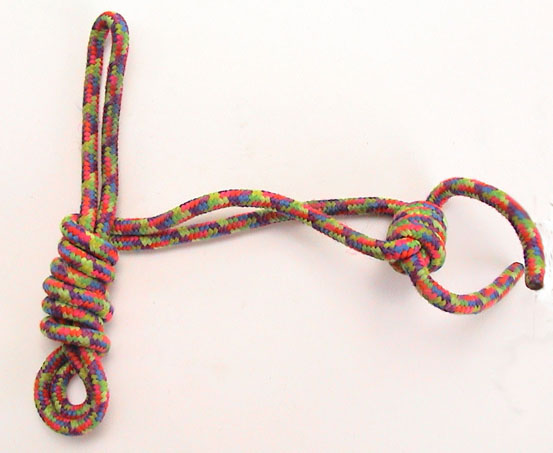
Step 1 (Click To Enlarge)Step 2 (Click To Enlarge)Step 3 (Click To Enlarge)
When you need to deploy the cord, a quick shake will work out the kinks.

sumber: http://www.chockstone.org/TechTips/prusik.htm#rack

Read more »

Improvising A Chest Harness

There are certain situations where a chest harness might be a good idea, but all you have is the standard waist and leg loops deal. In a pinch, improvising one could be an option. If you're thinking of belaying children I personally wouldn't trust something like the sling method shown below. Buy a real kids chest harness for them.

Right: The REI adjustable chest harness. To be used in conjunction with a sit harness.

The chest harness is supposed to keep the climber upright in the event of a fall. Also possibly handy if you're lowering an injured climber for example. Certain devices (such as some self belay devices), require you to wear a chest harness. Other situations might lend themselves to using one, like when wearing a large pack. As with all pages on Chockstone, I make no claim the following is accurate or suitable for the purpose. (See: full disclaimer).

To improvise a chest harness using two short slings follow these steps:

Improvised Chest Harness (Click To Enlarge)Improvised Chest Harness (Click To Enlarge)
Step 1: Tie two small slings together using a Girth Hitch or possibly something stronger, and drape it over your shoulders as shown. Adjust as necessary. Step 2: Join the loops in front of your chest with a locking carabiner, and clip the rope tied off from your normal harness to this crab. Step 3: At this point you might choose to stabilise the configuration with a short prusik tying the rope to the carabiner (not pictued).

Note: In case it isn't obvious the sling chest harness shown above is used in conjunction with a normal sit harness, never as the sole means of support. Also note that this is an improvised, emergency use kind of thing, and could well be dammed uncomfortable if not totally useless.

sumber : http://www.chockstone.org/TechTips/Chest.htm

Read more »

Stick Clipping

Standing amidst the loose rubble at the base of sport climb your eye is drawn upwards, scanning for the first bolt. A long, long way's up you finally spot it just shy of a cruxy sequence. "Errr... Your lead dude". Stick Clip (Click To Enlarge)

Of course stick clipping is not only in the domain of sport climbing shenanigans. It's been known to find it's way up big walls, to help aid climbers avoid top stepping madness. These days the concept is so well entrenched you can buy prefabricated stick clips complete with telescopic poles. However, to improvise one, follow these steps:

Step 1: Find an appropriate length stick and tape a quickdraw to it's top as shown. (Sports tape is often found in a climber's arsenal, for taping finger injuries or creating a crack climbers glove. You can use band-aids in a pinch). Don't get carried away with the taping job, it needs to only just hold the draw.

Step 2: Using a small twig, with a Y shape at one end, force the gate open.

Step 3: Clip the rope through the lower crab as per normal, then reach up with the stick to clip to fixed protection. When you've tagged it, a quick yank should dislodge or snap the twig and tear away the tape. And there you have it, an instant top rope.

La Xriba from Sonoran Mountain ProductsEpic Sport Stick ClipOf course not everyone may approve of the method. A certain ethical perspective overshadows these kinds of goings on, however, as long as you recognise it as a point of aid, and don't brag about a clean lead, you're unlikely to be bailed up by hex wielding grey beards. If you want to get a little more advanced (oh the shame), try using tent poles, wind-sock poles, window washing poles, or go buy something like the "Pika Reacher Stick".

Right: The "Epic Sport" Stick clip, available from most climbing shops. Far Right: The La Xriba from Sonoran Mountain Products.

Alternatively, there are devices on the market for the more serious stick clipper, such as the Epic Sport (pictured right), and the La Xriba (pictured far right), which, according to it's creator is "a stick clip device that not only puts the draws on, but is built to take them off and also has a mechanism for getting the rope into a hanging carabiner".


Stick Clipping An Existing Quickdraw Push For The Summit
[ From Kyle, Will & Rich, See: Forum Topic ]

It is less complicated than people expect:

  • Do the knot far enough from the end of the rope so that both ends will be within reach after the clip!
  • From a generous loop of rope, grab two bights about 20cm long and adjacent to each other - one in each hand.
  • Tie these loops together around the end of your chosen stick with a simple overhand knot (which is the first bit of a shoelace knot).
  • Adjust/tension the knot, since it will be quite insecure.
  • Arrange the bite of rope (the one you are going to put round the biner) so that it is an open loop just big enough to go round the biner and is lying in a horizontal plane and will go easily over the biner - easy with a stiff rope like mine.
  • Decide which end you are going to loop around the biner and hence which end of the knot to pull.
  • Gingerly raise the knot and stick to biner.
  • Put the loop around the biner so that it wraps around the spine of the biner and the gate.
  • Slowly pull in the rope till it is snug on the gate.
  • Keep pulling rope so that it forces the gate open and falls into the biner. pull the stick away and the 'knot' will fall away leaving your rope pre-clipped through the first draw.
sumber : http://www.chockstone.org/TechTips.htm
Read more »

Selasa, 30 Desember 2008

Avoiding The Infamous Self Unclipping Quickdraw

Correctly Clipped (Click To Enlarge)

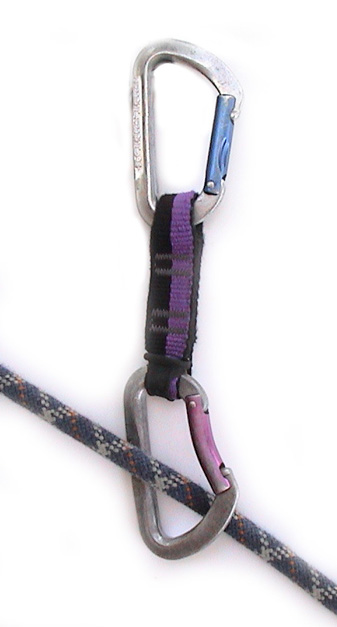
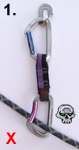
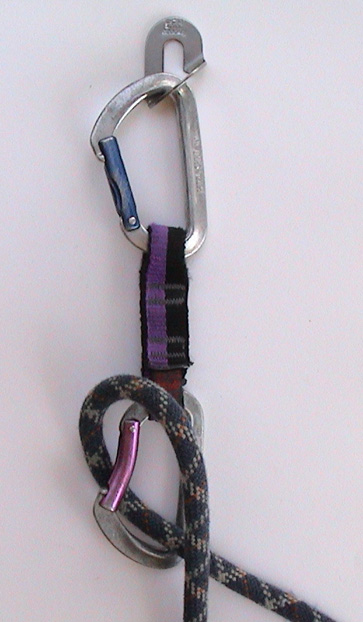
Sport and Trad climbers alike should be well aware of the need to avoid back clipping quickdraws. Just in case you've forgotten, here's a quick reminder. The basic concept is to try and keep the rope running along the spine of the carabiner (correct clip shown right) when moving left or right of the placement, so that during a fall the rope will not be in danger of landing across the gate. This becomes more of an issue with bent gate carabiners and climbs that wander around rather than being straight up. The incorrect clip is shown below:
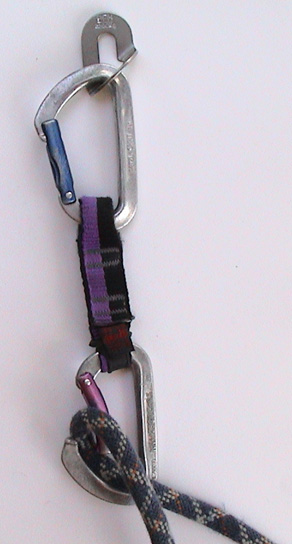
Death Clip (Click To Enlarge)Death Clip (Click To Enlarge)Death Clip (Click To Enlarge)
Figure 1: Note, the climber's direction of travel. He is moving upwards, but angling from the right of the draw to the left of it. Figure 2: A fall flips the rope over the gate of the carabiner. Figure 3: Self unclip!

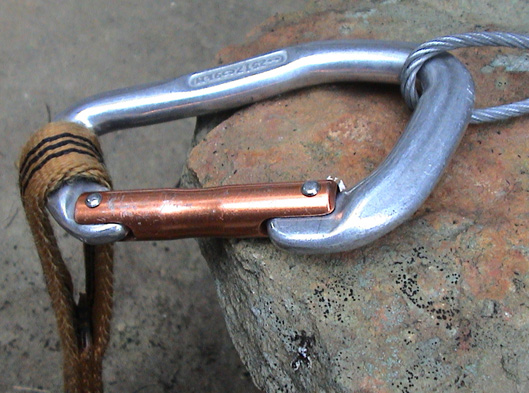
Another means of avoiding the self unclip would be to rotate the carabiner through which the rope passes, such that the gate opening instead resides at the top. Also the usual cautions regarding carabiners should be mentioned, such as avoiding placements where protruding rock features threaten to open the gate, and avoiding loading the carabiner over an edge.
Do not load carabiner over an edge (Click To Enlarge)Avoid protruding rock features that might open the gate (Click To Enlarge)
Above Left: Do not load carabiner over an edge. Above Right: Avoid protruding rock features that might open the gate.

sumber: http://www.chockstone.org/TechTips/Unclip.htm

Read more »

Avoiding The Infamous Self Unclipping Quickdraw

Correctly Clipped (Click To Enlarge)

Sport and Trad climbers alike should be well aware of the need to avoid back clipping quickdraws. Just in case you've forgotten, here's a quick reminder. The basic concept is to try and keep the rope running along the spine of the carabiner (correct clip shown right) when moving left or right of the placement, so that during a fall the rope will not be in danger of landing across the gate. This becomes more of an issue with bent gate carabiners and climbs that wander around rather than being straight up. The incorrect clip is shown below:
Death Clip (Click To Enlarge)Death Clip (Click To Enlarge)Death Clip (Click To Enlarge)
Figure 1: Note, the climber's direction of travel. He is moving upwards, but angling from the right of the draw to the left of it. Figure 2: A fall flips the rope over the gate of the carabiner. Figure 3: Self unclip!

Another means of avoiding the self unclip would be to rotate the carabiner through which the rope passes, such that the gate opening instead resides at the top. Also the usual cautions regarding carabiners should be mentioned, such as avoiding placements where protruding rock features threaten to open the gate, and avoiding loading the carabiner over an edge.
Do not load carabiner over an edge (Click To Enlarge)Avoid protruding rock features that might open the gate (Click To Enlarge)
Above Left: Do not load carabiner over an edge. Above Right: Avoid protruding rock features that might open the gate.

Read more »

Senin, 29 Desember 2008

Cordelette For Equalising Anchors

You're leading the last pitch. It's been a long day and now the sun is setting. Topping out you glance around for potential belay anchors. The trad options aren't obvious. Ten minutes later you're still dicking around, shortening slings, shifting clove hitches, tying off portions of the climbing rope. It's a mess and the damn anchors still don't look equalised. What's more that comfy seat has a spike of rock that is threatening your future plans for fatherhood. No time to shift it now.... "On belay!"

If only there was a faster, simpler way? Well there is. Enter the "cordelette". It's hardly a new concept, and despite the ease with which it can equalise anchors the cordelette is still, somewhat surprisingly, not yet on everyone's rack. For trad multi-pitch I carry two, one for the belay at the bottom of a pitch and one for the belay at the top.

Above Right: A cordelette made from 6 metres of 7mm accessory cord and twist racked. Below Right: The "Eyes" of a snake cordelette made from webbing.

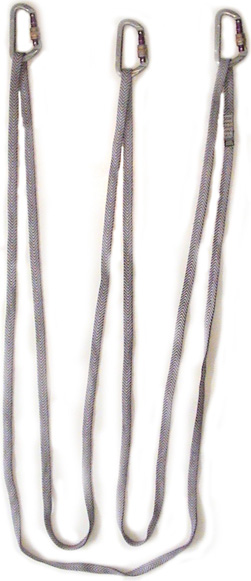
"Eyes" of the Snake Webelette (Click To Enlarge)The cordelette is just a large sling, 6 or so metres in length. To create one on the cheap it can be made from 7mm or thicker accessory cord (perlon) tied in a loop with a triple fisherman's knot (as for double fishermans, but with an extra stopper knot on each side). A little dearer you could also use, for example, 5.5mm Blue Water Titan (spectra) cord. The disadvantage with cord is that it can become twisted (pig tailing), fairly easily and depending on the cord you use can present a reasonably bulky profile on your rack. Also the knot forming the loop can sometimes get in the road. Mountain Tools Webolette.Metolius Equalizer Super Sling

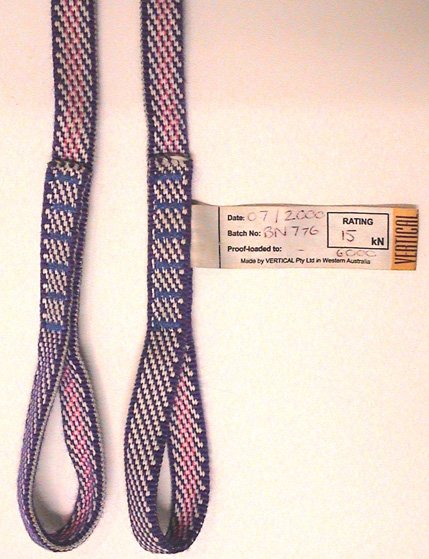
To alleviate these concerns, my preference is to purchase a pre-sewn cordelette made from super strong tape or webbing, just like a large (6m or so) sewn sling. These come in two versions, the normal sewn loop or my personal favourite the "snake", which rather than being sewn in a loop is left as a single length but with "eyes" (pictured right) sewn on each end. The "snake" provides that extra distance over the loop, giving you more bang for the buck - important when your anchors are not so close together. The snake also means you have less strands to deal with.

Above Left: Some examples of the "Snake" concept are the one from "Vertical" a Western Australia manufacturer (See: Rock Hardware), pictured above right, and the "Mountain Tools Webolette ®" (Image curtesy of Mountain Tools ®, See: Their Webo-what? page), and "Metolius Equalizer Super Sling" pictured above left.


Equalising Anchors With A Cordelette Push For The Summit

One important feature of the cordelette is it's ability to speed up equalising anchors for a belay station. Rather than stuffing around with slings of varying lengths and tied off portions of the climbing rope, you simply follow these steps:
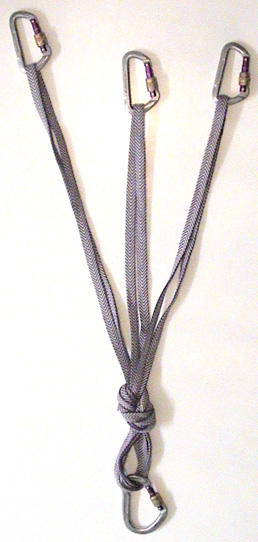
CordeletteStep 6 (Click To Enlarge)
Step 1: Loop the cordelette through each anchor in the fashion shown above. Step 2: Grab the loops at the bottom and pull them all tightly together letting the strands slip through your fingers so that they come together at one central point. Locate this point, suitable for the belay, at the appropriate place in three dimensional space such that it will be lined up with the direction of the load.
Step 2 (Click To Enlarge)Step 4 (Click To Enlarge)Step 5 (Click To Enlarge)
Steps 3 to 5: Form a figure eight on a bight, or the over-hand knot shown above, and clip to the load. The overhand uses slightly less material, handy if you're running short, however the figure eight should be slightly easier to untie after it's weighted.

As well as fast equalisation, another major benefit of using a cordelette, knotted as shown, is that it effectively ties off each anchor, offering very little extension if one of the anchors fails. Obviously the system relies on the direction of the load being known beforehand. You will need to untie & retie the knot to shift the belay to a new position. However, you're only moving one knot, instead of a whole mess of slings. Much simpler! If it's not safe to untie the central knot, you can take up slack on any given arm of the cordelette by temporarily unclipping that arm from it's anchor and adding a figure eight or over hand knot, just as you would have done to shorten a sling.

Note this article does not discuss how to create a suitable belay station. The pictures above are obviously vastly simplified for the purpose of illustration. Often you might need a fourth anchor, independant of the cordelette, to hold an upwards pull, for example. Or you might need to extend one arm of the cordelette to avoid using trad placements all in the same rock feature. Note, also that the angle between anchor points should not be greater than about 90 degrees or the whole point of equalisation will work against you rather than for you. (See: Equalising Anchors).


Racking Your Cordelette Push For The Summit

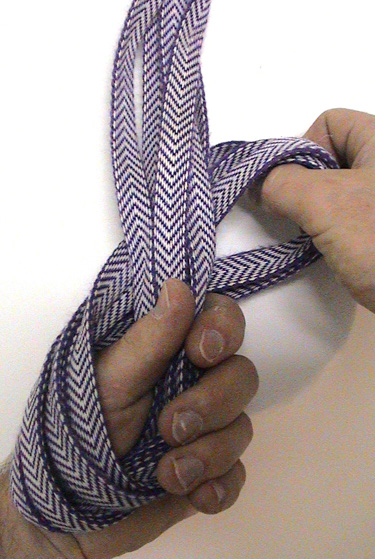
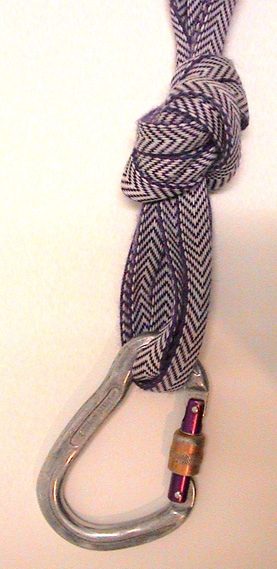
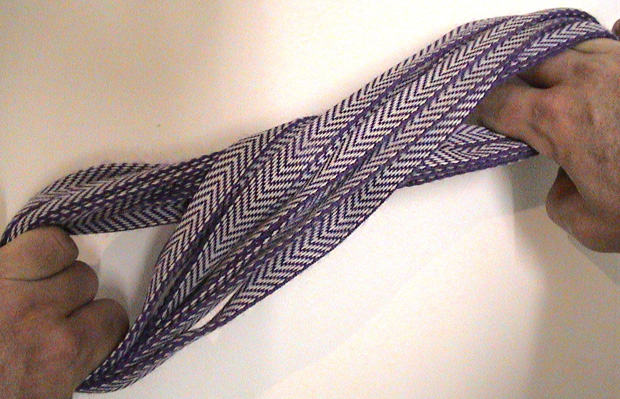
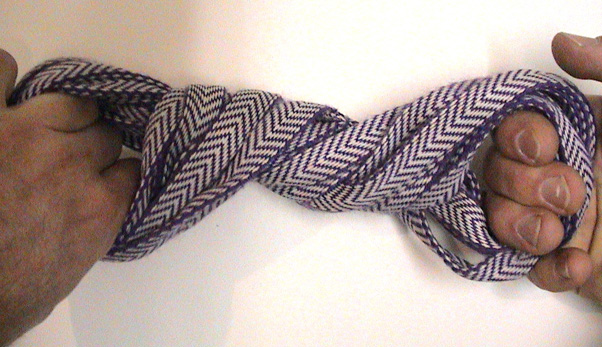
One way to rack your cordelette is to fold it in half, then half again, and half once more, or until it's down to a manageable size, then twist it up, as in the steps below:
Step 1 (Click To Enlarge)Step 2 (Click To Enlarge)
Step 3 (Click To Enlarge)Step 4 (Click To Enlarge)Step 5 (Click To Enlarge)
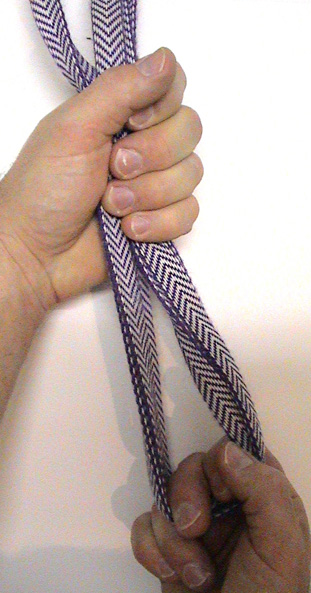
Step 1: Fold in half, again and again until it's small enough. Don't let go of the tails. Steps 2 & 3: Twist the remaining material a few times until it presents as small a profile as possible. Steps 4 & 5: Clip to a large carabiner and it's ready to go on your rack.

sumber : http://www.chockstone.org/TechTips/Cordelette.htm

Read more »

 
Cheap Web Hosting | Top Web Hosts | Great HTML Templates from easytemplates.com.